
04 August 2026
Bathroom Renovation in Old Apartments 2026 | Mudelar
Planning a bathroom renovation in your old Portuguese apartment? Discover the unique challenges, from plumbing to layout. Master the process. Get a free quote.
Hi, I'm Marco Rodrigues, a project manager here at Mudelar. For over a decade, I've specialised in transforming kitchens and bathrooms across Lisbon and its surroundings. I’ve seen first-hand the unique character and challenges hidden within the walls of Portugal's beautiful old apartment buildings. A bathroom renovation in an old apartment is more than a cosmetic update; it's a deep dive into the building's history. These projects require a special kind of expertise to navigate outdated plumbing, uneven walls, and compact layouts. This guide will walk you through everything you need to know, from the initial assessment to choosing the right materials and managing the entire process for a stunning, functional result.
Quick summary
- Assess the Unseen: Before any design work, a thorough inspection of existing plumbing, electrical wiring, and ventilation is critical in old buildings to identify mandatory upgrades.
- Embrace the Quirks: Uneven walls and floors are common. Planning for them with the right materials and skilled installers is key to a polished finish.
- Prioritise Plumbing: Replacing old lead or iron pipes with modern multilayer or PEX systems is non-negotiable for long-term reliability and health.
- Maximise Every Centimetre: Smart layout choices like wall-hung toilets, walk-in showers, and custom niche storage can transform a cramped space.
- Choose Materials Wisely: Opt for durable, moisture-resistant materials like rectified porcelain tile and engineered quartz to combat dampness, a common issue in older Portuguese properties.
- Ventilation is Essential: Proper mechanical ventilation is not a luxury but a necessity to prevent mould and protect the building's structure and your health.
- Work with Experts: A successful bathroom renovation in an old apartment requires a team experienced with the specific challenges these properties present, from navigating condo rules to skilled craftsmanship.
Table of contents
- The Unique Challenges of Old Apartment Bathrooms
- Initial Assessment and Planning: Your First Steps
- Updating Plumbing and Electrical Systems: The Hidden Foundation
- Layout and Space Optimisation in Compact Bathrooms
- Choosing Materials for Durability and Style
- The Renovation Process: A Step-by-Step Guide
- Ventilation and Moisture Control: A Non-Negotiable Priority
The Unique Challenges of Old Apartment Bathrooms
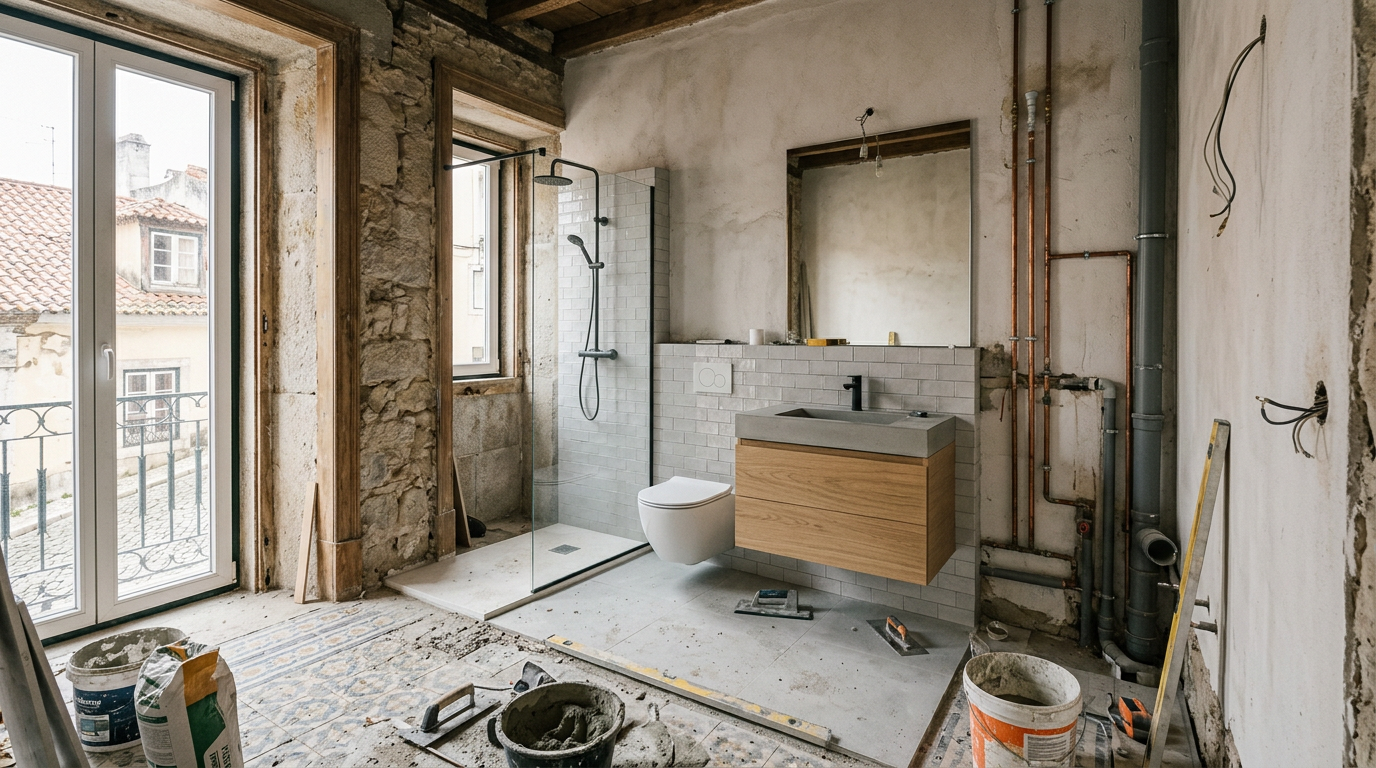
Renovating a bathroom in a classic Lisbon 'prédio antigo' or a character-filled building in downtown Porto is a completely different ball game compared to working in a modern build. The charm comes with a set of specific technical hurdles. We often find walls that aren't perfectly straight or square, which demands meticulous preparation and tiling work. The floors might also be uneven, requiring self-levelling compounds before any new flooring can be laid. It’s these quirks that make the project exciting but also more complex.
Beneath the surface, the real challenges lie. The plumbing is frequently the biggest issue. It's not uncommon to find outdated lead or galvanised iron pipes that are corroded, prone to leaks, and can even pose health risks. Similarly, electrical wiring from decades past rarely meets modern safety standards for wet environments. A simple cosmetic refresh that ignores these core systems is a recipe for problems down the line. That's why we always advocate for a full bathroom renovation in an old apartment that addresses these foundational elements.
Dealing with 'Gaioleiro' and 'Placa' Structures
Many older apartment blocks in Lisbon were built using 'Pombalino' or 'gaioleiro' construction methods, featuring wooden internal structures. Others use concrete slab ('placa') construction. Each type influences how we approach renovations. With wooden structures, we must be incredibly careful about weight distribution and waterproofing to prevent rot. When rerouting pipes or installing heavy fixtures, we need to assess the floor joists. In concrete slab buildings, chasing walls for new pipes and wiring is more straightforward but requires the right tools and techniques.
Navigating Condominium Rules
When you live in an apartment building, you're part of a community with shared rules (the 'condomínio'). Major renovations, especially those involving plumbing and structural elements, often require notification or even approval from the building administration. This is particularly true if the work affects shared plumbing stacks or the building's facade. As part of our service at Mudelar, we help clients understand and navigate these requirements to ensure a smooth process without any neighbourly disputes. It's always best to be transparent from the start.
Initial Assessment and Planning: Your First Steps
Before a single tile is removed, a successful renovation begins with a thorough and professional assessment. This is where my team and I come in to inspect the space meticulously. We look for signs of damp, active leaks, poor ventilation, and the condition of the existing pipes and wiring. We use moisture meters and our experienced eyes to spot problems that might not be visible to the homeowner. This diagnostic phase is crucial for scoping the project accurately and avoiding unpleasant surprises once the work begins.
The next step is to merge your vision with the physical realities of the space. What are your goals? Are you looking to create a brighter, more open feel? Do you need more storage? Is a walk-in shower a priority over a bathtub? We'll take precise measurements and discuss all the possibilities. This is the stage where we create a detailed plan and a 3D design, allowing you to visualise the final result before we commit to the layout. A solid plan is the blueprint for a seamless renovation.
Defining Your Functional Needs
Think about how you use your bathroom daily. Is it a busy family bathroom that needs robust storage and easy-to-clean surfaces? Or is it a personal ensuite where you can indulge in more luxurious finishes? Consider who will be using it now and in the future. Accessibility might be a concern, making a curbless, walk-in shower a smart choice. We help you translate these functional needs into concrete design decisions, ensuring the new bathroom isn't just beautiful but perfectly tailored to your lifestyle.
Creating a Mood Board and Material Palette
Once the layout is defined, we move on to the fun part: selecting the materials and finishes. I always encourage clients to gather inspiration. Create a Pinterest board or collect images of bathrooms you love. This helps us understand your aesthetic preferences. We can then propose a cohesive material palette, sourcing samples of tiles, countertops like Silestone, and cabinet finishes from brands such as Egger. Seeing and touching the materials together ensures the final look is harmonious and meets your expectations.
Updating Plumbing and Electrical Systems: The Hidden Foundation
The single most important part of a bathroom renovation in an old apartment is overhauling the plumbing and electrical systems. It’s the work that happens inside the walls, and while you won't see it, it's what guarantees the safety and longevity of your new bathroom. In properties across Setúbal, Almada, and older Lisbon neighbourhoods, we almost always find old pipes that need complete replacement. Continuing to use corroded galvanised pipes is just asking for a leak that could damage your newly renovated space and your neighbours' property below.
We systematically replace all old water supply and drainage pipes with modern, reliable materials. For water supply, we use PEX or multilayer composite pipes, which are flexible, resistant to corrosion and limescale buildup, and have a very long lifespan. For drainage, we use PVC. This comprehensive replacement ensures excellent water pressure and eliminates the risk of future leaks. It's a fundamental investment in the health of your home and your peace of mind.
Electrical Safety in Wet Zones
Water and electricity are a dangerous mix, and old wiring is a significant hazard. Portuguese safety regulations (RTIEBT) are very strict about electrical installations in bathrooms, dividing the space into different zones with specific requirements. All new wiring must be properly grounded and protected by a residual-current device (RCD). Sockets and switches must be located at a safe distance from the shower or bath. We always install new, dedicated circuits for the bathroom to handle modern loads like powerful extractor fans, heated towel rails, and LED lighting, ensuring your installation is 100% compliant and safe.
Choosing Quality Fixtures
The plumbing update isn't just about the pipes in the wall; it extends to the fixtures you see and use every day. Investing in quality taps, mixers, and shower systems from reputable brands like Grohe or Roca makes a huge difference. A thermostatic shower mixer, for example, maintains a constant water temperature, preventing scalding and providing a much more comfortable experience. Quality fixtures are more durable, less prone to dripping, and contribute to the overall reliability of your new plumbing system.
Layout and Space Optimisation in Compact Bathrooms
Bathrooms in older Portuguese apartments, particularly in dense urban centres like Lisbon or Porto, are notoriously compact. The key to a successful renovation is not just updating the look but fundamentally improving the functionality through smart layout design. Our primary goal is often to create a sense of spaciousness and efficiency. Simply replacing old fixtures in the same positions is a missed opportunity. We analyse the room's geometry to find the optimal arrangement.
One of the most effective strategies is replacing a bulky, underused bathtub with a sleek, walk-in shower. This immediately opens up the floor area and creates a more modern, accessible space. We often build the shower tray flush with the floor, using large-format tiles and a glass screen to enhance the feeling of openness. Another game-changer is swapping a traditional floor-standing toilet for a wall-hung model from a brand like Sanindusa. This lifts the fixture off the floor, making the room appear larger and significantly easier to clean.
Clever Storage Solutions
Clutter is the enemy of a small space. Effective storage is essential. Instead of bulky, freestanding cabinets, we design integrated solutions. Recessed niches in the shower wall are perfect for storing shampoos and soaps without intruding into the space. A custom-built vanity unit with deep drawers provides far more usable storage than a simple pedestal sink. We can also incorporate tall, shallow cabinets or use the space above the toilet for shelving. The goal is to have a designated place for everything, keeping your surfaces clear.
Using Light and Mirrors to Create Space
Visual tricks can have a massive impact on how large a bathroom feels. A large, simple mirror, perhaps covering an entire wall above the vanity, can visually double the size of the room while reflecting light. The lighting plan itself is also critical. We move away from a single, central ceiling light and instead use a layered approach: bright, functional lighting around the mirror for grooming, complemented by softer, ambient lighting from recessed ceiling spotlights. A well-lit space always feels bigger and more inviting.
Choosing Materials for Durability and Style
Selecting the right materials is paramount in a bathroom renovation, especially in an older building where moisture can be a persistent issue. The choices you make will determine not only the aesthetic but also the durability and maintenance requirements of your new space. We always guide our clients towards materials engineered to perform in wet environments. This focus on technical quality is what ensures your beautiful new bathroom stays that way for years to come.
For floors and walls, rectified porcelain tile is our go-to recommendation. The 'rectified' edge means the tiles are cut to a precise size, allowing for very thin grout lines (1-2mm). This creates a clean, almost seamless look and means less grout to clean and maintain. Porcelain is virtually non-porous, making it impervious to water and an ideal choice for shower walls and bathroom floors. It comes in an endless variety of styles, from timber-look planks to large-format stone effects.
Countertops and Cabinetry
For vanity countertops, engineered quartz from brands like Silestone or Compac is a superior choice. Unlike natural stone like marble, which is porous and can stain easily, quartz is non-porous, highly resistant to stains, scratches, and bacteria. It provides a durable and hygienic surface that's easy to care for. For the cabinets themselves, we use moisture-resistant MDF. Standard MDF will swell and delaminate in a humid bathroom environment, but this specially treated version, often from manufacturers like Egger or Kronospan, is designed to withstand the damp, ensuring your custom vanity remains stable and looks great.
Waterproofing: The Most Important Layer
Before any beautiful tile is laid, the most critical material is the one you'll never see: the waterproofing membrane. In all wet areas, especially the shower, we apply a liquid rubber or sheet membrane to the walls and floor. This creates a completely sealed, tank-like barrier that prevents any water from penetrating the substrate. Skipping or improperly applying this layer is one of the most catastrophic mistakes in a bathroom renovation, leading to mould, structural damage, and costly repairs. We treat this step with the utmost seriousness.
The Renovation Process: A Step-by-Step Guide
Understanding the timeline and sequence of a bathroom renovation in an old apartment helps manage expectations. A full, down-to-the-studs renovation is a complex operation that typically takes between 15 and 20 working days, assuming no major structural surprises. At Mudelar, we manage this entire process to ensure it runs smoothly and efficiently.
Here’s a typical breakdown of the project phases:
- Phase 1: Protection and Demolition (Days 1-2): We start by protecting all common areas of the building, like hallways and lifts. Then, we carefully demolish the existing bathroom, removing all tiles, fixtures, and old plumbing. All debris is bagged and removed from the site daily.
- Phase 2: Rough-ins (Days 3-6): This is when the new foundation is laid. Our certified plumbers and electricians run all new pipes for the water supply and drainage, and install new wiring for lights, sockets, and the extractor fan. This is a noisy and dusty phase, but it's crucial to get it right.
- Phase 3: Wall Preparation and Waterproofing (Days 7-8): With the new systems in place, we repair and prepare the walls and floor. This often involves applying plaster and a levelling compound to create a perfect substrate for the tiles. We then apply the critical waterproofing membrane in the shower and other wet zones.
- Phase 4: Tiling and Grouting (Days 9-12): This is where the new look starts to emerge. Our skilled tilers meticulously lay the porcelain tiles on the floor and walls. After the adhesive has fully cured, they apply the grout and seal it where necessary.
- Phase 5: Installation and Painting (Days 13-18): The final pieces come together. We install the toilet, vanity, shower screen, taps, and all fixtures. The ceiling and any non-tiled walls are painted with mould-resistant paint. The electrician returns to install the lights, switches, and extractor fan.
- Phase 6: Final Touches and Handover (Days 19-20): We perform a deep clean of the entire space. Silicone is applied around the fixtures to create a watertight seal. We conduct a final inspection with you to ensure every detail is perfect before handing over your brand new bathroom.
Ventilation and Moisture Control: A Non-Negotiable Priority
Request a free, no-commitment quote. We reply within 24 hours.
Request a quote →In the humid climate of coastal cities like Lisbon, Aveiro, or Setúbal, and within the enclosed spaces of old apartment buildings, proper ventilation is not just a feature—it's a fundamental requirement for a healthy home. Old bathrooms often have inadequate ventilation, leading to condensation, persistent dampness, and the growth of mould and mildew. This can damage paint, grout, and cabinets, and more importantly, it can have negative health implications.
A key part of any modern bathroom renovation in an old apartment is the installation of an effective mechanical extractor fan. Even if the bathroom has a window, a fan is essential for actively removing moist, warm air directly to the outside. We always install a powerful, quiet fan that is ducted to the exterior of the building. It's typically wired to the light switch with a timer, so it continues to run for a few minutes after you've left the room, ensuring all humidity is extracted.
Preventing Mould Growth
Beyond the extractor fan, our entire construction methodology is designed to combat moisture. The waterproofing membrane prevents water from getting into the walls, using moisture-resistant MDF for cabinetry prevents swelling, and choosing non-porous materials like porcelain and engineered quartz denies mould a place to grow. We also use high-quality, mould-resistant paint and silicone for the finishing touches. This multi-layered approach creates a robust defence against the dampness that can plague older properties.
The Importance of a Window
If the bathroom has a window, we ensure it's in good working order. Old wooden or single-glazed metal frames are often a source of drafts and condensation. Upgrading to a modern, double-glazed uPVC or aluminium window can significantly improve thermal insulation and reduce condensation on the glass itself. A tilt-and-turn window is an excellent option for a bathroom, as it allows for secure ventilation. Combining a good window with a mechanical extractor fan provides the ultimate solution for moisture control.
Recommended materials and options
Here is a table of materials we frequently recommend for bathroom projects in older buildings. Note that these are chosen for their technical performance and durability, not just aesthetics.
| Type | Features | When to choose |
|---|---|---|
| Rectified Porcelain Tile | Minimal grout lines, highly durable, completely water-resistant. | For a modern, clean look on floors and walls that is easy to maintain. |
| Engineered Quartz (e.g., Silestone) | Non-porous, stain-resistant, wide range of consistent colours. | For vanity tops and shower sills that need to be durable and hygienic. |
| Moisture-Resistant MDF | Specially treated to resist humidity and swelling over time. | For custom bathroom cabinets and vanities in damp environments. |
| Wall-Hung Toilet (e.g., Roca, Sanindusa) | Saves floor space, makes cleaning the floor much easier, modern aesthetic. | To maximise perceived space in small or narrow bathrooms. |
| Thermostatic Shower Mixer (e.g., Grohe) | Maintains constant water temperature, preventing scalding and thermal shock. | For safety, comfort, and a high-end feel in any shower system. |
| PEX or Multilayer Piping | Flexible, corrosion-resistant, fewer joints reduces leak potential. | When replacing old lead or iron pipes for a reliable, long-lasting plumbing system. |
Quick comparison
Choosing the right flooring is a key decision. Here’s a quick comparison of the most common options we install in bathrooms.
| Flooring Type | Pros | Cons | Ideal For |
|---|---|---|---|
| Porcelain Tile | Extremely durable, waterproof, huge variety of styles and sizes. | Colder underfoot (can be mitigated with underfloor heating), can be slippery if not textured. | The go-to choice for almost any bathroom; perfect for high-traffic areas and wet zones. |
| Luxury Vinyl Tile (LVT) | Warm and soft underfoot, 100% waterproof, good for covering slightly uneven floors. | Can be dented by heavy, sharp objects; perceived as less premium than tile. | Renovations where levelling the original floor is complex or budget is a primary driver. |
| Microcement | Seamless and continuous look, fully waterproof when sealed correctly, modern aesthetic. | Requires highly specialised installation, can show hairline cracks if the building substrate moves. | Achieving a minimalist, industrial aesthetic on floors and walls for a statement look. |
Common mistakes to avoid
Over the years, I've been called in to fix many bathroom renovations that went wrong. Here are the most common mistakes I see, which you should be careful to avoid:
- Ignoring the Old Plumbing. Putting beautiful new tiles and fixtures on top of old, corroded pipes is the biggest mistake. A leak is almost inevitable, and the cost of ripping everything out to fix it will be heartbreaking.
- Neglecting Ventilation. Failing to install a proper mechanical extractor fan, especially in a bathroom without a window, will lead to mould, peeling paint, and a perpetually damp environment. It's a false economy to skip this.
- Choosing the Wrong Materials. Using porous materials like unsealed natural stone or standard MDF for cabinets will lead to staining, water damage, and deterioration. Always choose materials specifically designed for wet areas.
- Poor Waterproofing. Incorrectly applying or, even worse, completely skipping the waterproofing membrane in the shower area is a catastrophic error. This is the single most important step for long-term durability.
- Bad Lighting Plan. Relying on a single, dim ceiling light makes a bathroom feel small and dingy. A layered lighting plan with good task lighting at the mirror is essential for functionality and ambiance.
- Trying to DIY Electrical Work. Electrical work in a bathroom is dangerous and highly regulated. Always use a certified electrician to ensure everything is safe, compliant, and correctly protected.
- Not Planning for Storage. It's easy to focus on the big items like the shower and toilet and forget about where you'll store towels, toiletries, and cleaning supplies. A lack of planned storage leads to a cluttered and dysfunctional space.
Pre-project checklist
Before you begin your renovation, run through this checklist to ensure you are fully prepared:
- [ ] Define Your Goals: List your 'must-haves' versus your 'nice-to-haves'. What is the primary problem you want to solve (e.g., more space, modern look, fix a leak)?
- [ ] Inspiration Gathering: Create a mood board on Pinterest or save images of bathrooms you love. This will help you and your designer communicate visually.
- [ ] Measure Your Space: Take basic measurements of your bathroom's length, width, and height. Note the position of the door, window, and existing plumbing fixtures.
- [ ] Check Condominium Rules: Speak to your building administrator about the planned works. Understand if you need to provide notice or get formal approval for the renovation.
- [ ] Consider Your Daily Routine: Think about how you use the space. Will a walk-in shower work better for you than a bath? Do you need two sinks?
- [ ] Think About the Future: Are you planning to stay in the apartment long-term? Consider timeless designs and accessibility features that could add value later.
- [ ] Assess Your Storage Needs: Make a quick inventory of everything you currently store in your bathroom. This will help you plan for adequate storage solutions.
- [ ] Schedule a Professional Consultation: Contact a reputable renovation company like Mudelar for an on-site assessment and a detailed quote. An expert eye will spot potential issues you might miss.
How Mudelar handles it
A bathroom renovation in an old apartment is a complex project that benefits from a turnkey approach. At Mudelar, we manage every single aspect from start to finish, providing you with a single point of contact and complete peace of mind. Our process begins with a detailed on-site visit and consultation where we listen to your needs and assess the technical requirements of the space. From there, our design team creates a full 3D visualisation, so you can see exactly how your new bathroom will look and feel.
We handle all material procurement, project scheduling, and coordination of our in-house team of certified plumbers, electricians, tilers, and carpenters. We take full responsibility for the quality of the work and for completing the project on time. Our experience with properties in Lisbon, Porto, Braga, and across Portugal means we are experts in navigating the unique challenges of older buildings. If you're ready to transform your bathroom, get a free quote and let us show you how straightforward the process can be. You can learn more about our services or read more about us on our website.
Frequently asked questions (FAQ)
How long does a bathroom renovation in an old flat take?
A complete bathroom renovation, including the replacement of all plumbing and electrical systems, typically takes between 15 to 20 working days. This timeline can be affected by the complexity of the project, the drying times for materials like plaster and waterproofing, and any unforeseen structural issues common in older buildings.
Do I need a permit to renovate a bathroom in Portugal?
For most internal bathroom renovations that don't alter the building's structure or facade, you generally only need to make a 'Comunicação Prévia' (Prior Communication) to your local council ('Câmara Municipal'). If the work involves significant structural changes, a full building license ('Licença de Obras') might be required. We can advise you on the specific requirements for your project in areas like Sintra or Oeiras.
Is it worth renovating a bathroom in an old building before selling?
Yes, almost always. A modern, well-executed bathroom is one of the key features that adds value to a property and attracts buyers. In an old apartment, a newly renovated bathroom signals that underlying issues like old plumbing have been taken care of, which gives potential buyers significant confidence and can lead to a faster sale.
What's the difference between porcelain and ceramic tiles?
The main difference is water absorption. Porcelain tiles are fired at a higher temperature and made from a denser clay, making them absorb less than 0.5% water. Ceramic tiles are more porous. For this reason, we exclusively recommend porcelain for bathroom floors and shower areas due to its superior durability and water resistance.
How do you deal with uneven walls in an old apartment?
This is a very common challenge. We address it by first removing the old tiles and plaster back to the brick or structural wall. We then apply a new layer of plaster, using straight edges and levels to create a perfectly flat and plumb surface before we even think about tiling. This preparation is key to a professional finish.
What is the best way to waterproof a shower area?
The most reliable method is to use a liquid-applied waterproofing membrane or a sheet membrane. This is applied over the wallboard and floor substrate before the tiles are installed. It creates a continuous, flexible, and seamless barrier that prevents any water from reaching the structure behind. It's a non-negotiable step in all our bathroom projects.
How to choose the right toilet for a small bathroom?
For small bathrooms, a wall-hung or a compact close-coupled toilet is ideal. A wall-hung model from brands like Roca or Sanindusa with a concealed cistern saves significant floor space and makes cleaning easier. Compact models have a shorter projection from the wall, which can also free up valuable room in a tight space.
Can you move plumbing fixtures in an old apartment block?
Moving fixtures like sinks and showers is usually straightforward as the supply and drainage pipes can be rerouted within your apartment. Moving a toilet is more complex as it's connected to a large, shared vertical soil stack. Relocating it is sometimes possible but depends heavily on the building's structure and may require approval from the condominium.
Conclusion
Embarking on a bathroom renovation in an old apartment is a rewarding journey that blends modern comfort with classic character. While the challenges, from outdated plumbing to irregular spaces, are real, they are entirely manageable with careful planning and expert execution. By focusing on the foundational elements—plumbing, electrical, and waterproofing—and making smart choices in layout and materials, you can create a space that is not only beautiful but also safe, functional, and built to last. If you're ready to take the next step and transform your bathroom in Lisbon, Porto, or beyond, our team at Mudelar is here to help. Request a free quote today and let's start planning your project together.
Ready to start your renovation?
Request a free, no-commitment quote. We reply within 24 hours.
Request a quoteLer em português: Remodelação Casa de Banho Apartamento Antigo 2026 | Mudelar