
31 July 2026
Grab Bars & Bathroom Safety: A 2026 Guide for Portugal | Mudelar
Ensure your home is safe with our guide to grab bars and bathroom safety features in Portugal. We cover planning, materials, and placement. Get a free quote.
As a project manager with over a decade of experience renovating bathrooms across Lisbon and Porto, I’ve seen firsthand how a few thoughtful changes can transform a hazardous space into a safe haven. Bathroom safety is a topic many of us prefer not to think about until an accident happens. Yet, with a bit of foresight, we can make our homes secure for ourselves, our parents, or anyone with mobility challenges. This guide is my commitment to you: a practical, no-nonsense look at grab bars and bathroom safety. We’ll cover everything from the correct placement and professional installation techniques to other crucial features that create a truly accessible bathroom, ensuring peace of mind for years to come.
Quick summary
- Placement is paramount: Installing grab bars in the wrong location makes them ineffective and potentially dangerous. Key zones are next to the toilet and inside the shower or bath.
- Professional installation is non-negotiable: Grab bars must be anchored into solid wall blocking or studs to support hundreds of pounds of force. This is not a typical DIY job.
- Material and finish matter: Choose stainless steel or other non-corrosive materials. Textured finishes offer better grip than smooth, polished ones, especially when wet.
- Suction cup bars are not a safe substitute: These are only for balance assistance and cannot bear significant weight. They are not a reliable safety device.
- Think beyond grab bars: True bathroom safety involves a holistic approach, including non-slip flooring, adequate lighting, walk-in showers, and appropriate toilet heights.
- Plan for the future: When renovating, consider incorporating accessibility features even if they aren't needed today. This is a smart investment in your property's long-term value and utility.
- Towel rails are not grab bars: They are not designed to support human weight and will fail under pressure, leading to serious injury.
Table of contents
- Understanding the Importance of Bathroom Safety in Portugal
- What Are Grab Bars and Where Should They Be Placed?
- Choosing the Right Grab Bar: Materials, Finishes, and Styles
- The Installation Process: A Professional's Perspective
- Beyond Grab Bars: Other Essential Bathroom Safety Features
- Planning a Fully Accessible Bathroom Renovation
- Recommended materials and options
- Quick comparison
- Common mistakes to avoid
- Pre-project checklist
- How Mudelar handles it
- Frequently asked questions (FAQ)
- Conclusion
Understanding the Importance of Bathroom Safety in Portugal
The bathroom is statistically one of the most dangerous rooms in any home. The combination of water, slippery surfaces, and hard fixtures creates a high-risk environment for slips and falls. This is a universal truth, but it holds particular relevance here in Portugal. Many of our beautiful homes, from apartments in central Lisbon to villas in the Algarve, have older bathrooms with layouts and materials that weren't designed with modern accessibility standards in mind. Small showers, high-sided bathtubs, and slick ceramic tiles are common challenges we encounter.
Furthermore, as we all live longer, the concept of aging-in-place becomes incredibly important. We want our homes to adapt to our changing needs rather than being forced to move. Implementing proper bathroom safety measures is a proactive step towards maintaining independence and quality of life for family members of all ages. It's not just for the elderly; anyone recovering from surgery, dealing with a temporary injury, or simply wanting to prevent accidents can benefit from a safer bathroom environment. This is about smart, future-proof design.
At Mudelar, we see a growing demand for these modifications in areas like Cascais and Oeiras, where residents are planning for their long-term comfort and security. A well-placed grab bar or a switch to non-slip flooring is not a compromise on style; it’s an enhancement to your home's functionality and a testament to thoughtful planning. The peace of mind that comes from knowing your bathroom is safe for everyone is an invaluable return on investment.
What Are Grab Bars and Where Should They Be Placed?
A grab bar is a safety device designed to be securely anchored to a wall to provide a stable handhold for support, balance, and leverage. Unlike a towel rail, which is only meant to hold a lightweight towel, a correctly installed grab bar is engineered to support a person's full body weight during a slip or while transitioning between positions (e.g., sitting to standing). They are a fundamental component of bathroom accessibility and are crucial for preventing falls.
Their effectiveness, however, is entirely dependent on correct placement. Installing a bar in the wrong spot can render it useless. The goal is to place them where a person will naturally reach for support during key movements. We follow established accessibility guidelines to determine the optimal height and location, which we then adapt to the specific user's height and mobility needs. Let's look at the three critical zones.
Next to the Toilet
The area around the toilet is a primary location for falls. The motion of sitting down and standing up can be challenging for many. We typically install two grab bars here:
- Rear Wall Bar: A horizontal bar mounted on the wall behind the toilet. It should be at least 60 cm long and positioned to allow the user to push up or lower themselves down with both hands.
- Side Wall Bar: A longer horizontal bar (typically 80-100 cm) mounted on the adjacent wall. Its front end should extend past the front of the toilet bowl, allowing for a steadying handhold during the entire transition. The standard height is between 84 cm and 91 cm from the finished floor to the top of the bar.
Inside the Shower or Bathtub
The wet and slippery environment of a shower or bath is another high-risk zone. The configuration depends on the setup:
- For Bathtubs: We install at least two bars. One horizontal bar along the side wall to assist with getting in and out, and a vertical bar near the controls to provide a stable handhold while standing or adjusting water temperature.
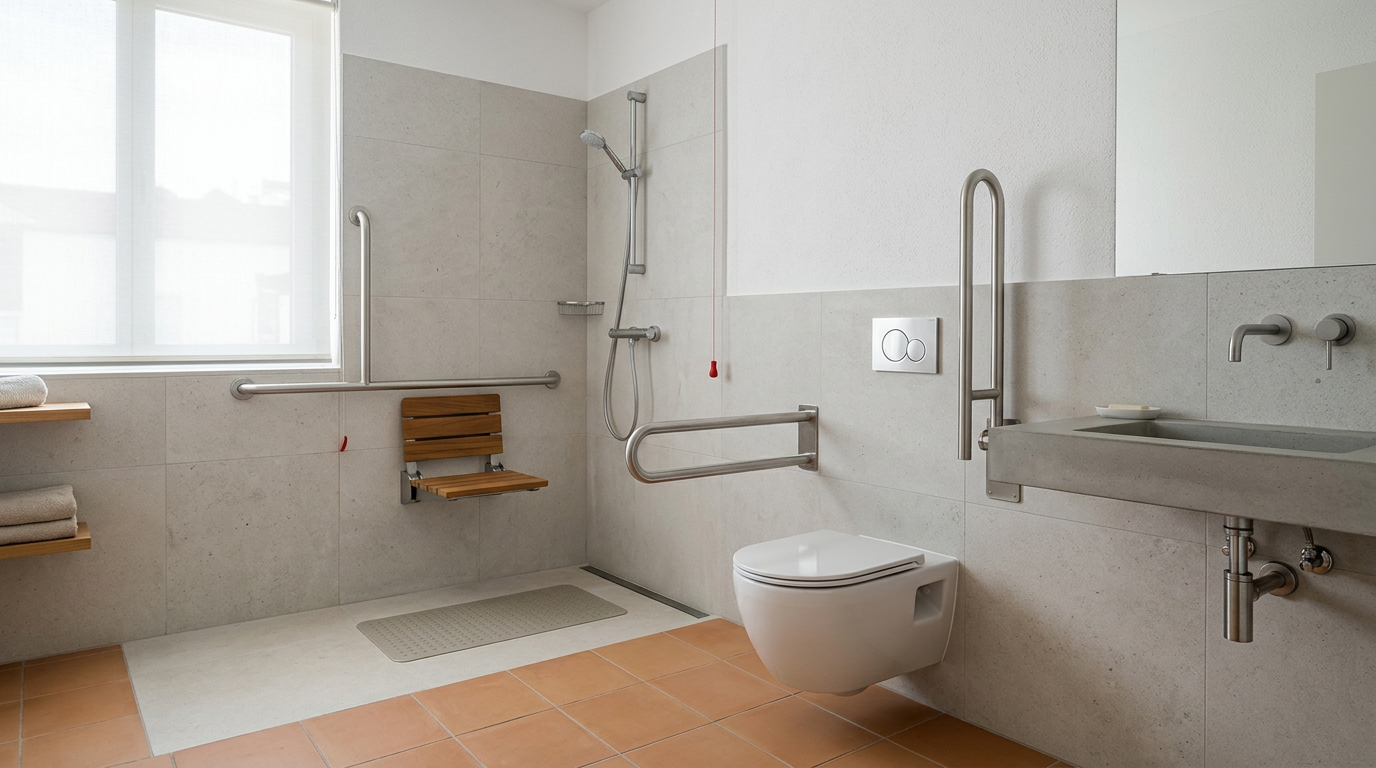
- For Showers: A vertical bar at the entrance is essential for safe entry and exit. Inside, a horizontal bar on the side wall provides stability while showering, and an L-shaped or diagonal bar on the control wall can be very versatile. Pairing these with a built-in or fold-down shower seat creates an exceptionally safe bathing area.
At the Entrance to the Bathing Area
Stepping over a bathtub curb or even a small shower threshold can be a balancing act. A vertical grab bar installed on the wall just outside the shower or tub entrance provides a crucial, stable point of contact. The user can hold onto it securely with one hand while lifting their legs over the obstacle with the other. This simple addition can prevent a significant number of falls that happen while entering or exiting the bathing area.
Choosing the Right Grab Bar: Materials, Finishes, and Styles
Gone are the days when grab bars were purely institutional-looking. Today, manufacturers like Roca and Sanindusa offer a wide range of options that blend seamlessly with your bathroom's design. However, aesthetics should never compromise safety. As a professional, I always guide clients to prioritise function and durability first.
The most important factor is the material. AISI 304 stainless steel is the gold standard. It's strong, highly resistant to corrosion and rust, and easy to clean—all essential qualities for the humid bathroom environment. Other options include chrome-plated brass or coated steel, but stainless steel offers the best long-term performance. We always ensure the bars we install can withstand a minimum load of 150 kg when properly anchored.
Finishes for Grip and Style
The finish of the grab bar affects both its look and its functionality. While a polished chrome finish might perfectly match your taps, it can become very slippery when wet. For maximum safety, I recommend textured finishes:
- Peened/Knurled Finish: This finish has a dimpled or cross-hatched texture that provides excellent grip, even with soapy hands.
- Brushed/Satin Finish: A good compromise between the slipperiness of polished finishes and the industrial look of textured ones. It offers a decent grip and hides water spots and fingerprints well.
- Coated Finishes: Some bars come with a vinyl or powder coating, which can offer a warmer feel and a secure grip. Ensure the coating is high-quality and won't chip or peel over time.
Diameter and Shape
The standard diameter for a grab bar is between 3.2 cm and 3.8 cm. This size allows for a firm, comfortable grip for most adult hands. Bars that are too thin can be difficult to hold securely, while those that are too thick can be hard to wrap your hand around. We also consider the shape—straight bars are the most common, but L-shaped, U-shaped, and angled bars can provide versatile support in corners or around toilets.
The Installation Process: A Professional's Perspective
This is where experience truly counts. A grab bar is only as strong as its mounting. I cannot stress this enough: improper installation is dangerous. Suction cup bars are unreliable, and simply screwing a bar into plasterboard or tile without proper backing will create a catastrophic failure point. As a project manager for Mudelar, my team's process is meticulous and focused on absolute structural integrity.
First, we must identify a secure anchoring point. The ideal solution is to screw the grab bar directly into the wall studs (the vertical wooden or metal framing inside the wall). We use a stud finder to locate them precisely. In many Portuguese buildings, especially older ones in Braga or Aveiro with solid brick or concrete walls, this isn't an option. In those cases, we use heavy-duty masonry anchors designed for the specific wall material.
Anchoring in Hollow Walls
When we can't align with a stud, which is common in bathrooms with specific tile layouts, we must create a secure anchor. We do not use standard plastic wall plugs for this. We use specialized hardware:
- Toggle Bolts: These have spring-loaded wings that open up behind the plasterboard, distributing the load over a larger surface area.
- Molly Bolts (Hollow Wall Anchors): These expand behind the wall, creating a very strong hold in materials like hollow brick or reinforced plasterboard.
- Wall Reinforcement: In a full renovation, the best practice is to install plywood blocking between the studs at the desired grab bar locations before the final wall finish (tile or plasterboard) goes up. This provides a solid wood surface to anchor into, offering the strongest possible support.
Drilling and Waterproofing
Drilling through bathroom tiles, especially hard rectified porcelain tile, requires specialized diamond-tipped drill bits and a very steady hand to prevent cracking. Once the holes are drilled and the anchors are in place, the final crucial step is waterproofing. Before mounting the grab bar's flange, we apply a generous bead of high-quality silicone sealant around the holes and on the back of the flange. This prevents any water from seeping into the wall cavity, which could lead to mould, rot, and structural damage over time.
Beyond Grab Bars: Other Essential Bathroom Safety Features
While grab bars are a cornerstone of bathroom safety, creating a truly secure environment requires a more holistic approach. A single fall can happen for many reasons, so addressing multiple risk factors is key. When we plan a renovation, especially for clients in areas like Setúbal or Almada who are thinking about long-term living, we discuss a complete system of safety features.
Non-Slip Flooring
This is arguably as important as grab bars. Standard glossy ceramic or porcelain tiles become incredibly hazardous when wet. We strongly recommend flooring with a high coefficient of friction. Modern porcelain tiles are available with certified anti-slip ratings (look for R10 or higher for residential bathrooms). Other excellent options include textured vinyl flooring or specialized resin floors. These materials provide a secure footing without sacrificing style.
Walk-in Showers and Low-Threshold Bases
One of the biggest hurdles in a bathroom is the high side of a bathtub. A walk-in shower, also known as a curbless or barrier-free shower, eliminates this obstacle entirely. The floor flows seamlessly from the main bathroom area into the shower. If a completely curbless design isn't feasible due to plumbing constraints, an ultra-low-profile shower tray (2-4 cm high) is still a massive improvement over a standard 40-50 cm bathtub wall.
Seating and Accessible Fixtures
Standing for a long period can be tiring or unstable for many people. A built-in tiled bench or a wall-mounted, fold-down shower seat provides a safe and comfortable place to sit while bathing. We also recommend installing a handheld shower wand alongside a fixed showerhead for greater flexibility. Furthermore, swapping standard toilets for 'comfort height' models (43-48 cm high) makes sitting and standing much easier. Finally, replacing traditional taps with single-lever or sensor-activated models from brands like Grohe can make a big difference for those with arthritis or limited hand strength.
Planning a Fully Accessible Bathroom Renovation
Integrating a few safety features into an existing bathroom is a great start, but for maximum long-term benefit, a full renovation provides the opportunity to design a space that is truly safe, comfortable, and accessible. This is where comprehensive planning with a professional team like Mudelar pays dividends. We go beyond just placing grab bars; we re-imagine the entire space to meet current and future needs.
A key consideration in a full accessibility project is circulation space. We ensure there is adequate clear floor space for easy movement, including a sufficient turning radius (typically a 1.5m diameter circle) if a wheelchair user might need to access the room. This often involves reconfiguring the layout, perhaps by removing a bidet or swapping a bathtub for a more space-efficient walk-in shower.
Doorways are another critical element. A standard bathroom door may be too narrow for a walker or wheelchair. We often recommend widening the doorway to at least 85 cm and installing a pocket door or an outward-swinging door to maximize internal floor space. Every detail, from the height of the light switches and power outlets to the type of storage, is considered to create a functionally superior and safer environment. For more about our comprehensive approach, see our services.
Recommended materials and options
Request a free, no-commitment quote. We reply within 24 hours.
Request a quote →| Type | Features | When to choose |
|---|---|---|
| Stainless Steel Grab Bar | AISI 304 grade, corrosion-resistant, high load capacity. Available in peened, brushed, or polished finishes. | The default, best-in-class choice for any installation in wet areas like showers and next to toilets. |
| Fold-Down Shower Seat | Wall-mounted, folds up to save space. Can be made from teak wood, phenolic resin, or padded vinyl. | For users who have difficulty standing for long periods. Essential for a safe seated shower experience. |
| Non-Slip Porcelain Tile | Rated R10 or higher for slip resistance. Wide range of styles and colours available. | The ideal flooring solution for any new bathroom or renovation project to prevent slips and falls. |
| Walk-in Shower Base | Ultra-low profile (2-4 cm) or completely level with the floor (curbless). Often made of resin with an anti-slip texture. | When eliminating tripping hazards is a top priority, especially for users with walkers or wheelchairs. |
| Comfort Height Toilet | Seat height is 4-5 cm higher than standard toilets, making it easier to sit and stand. | For elderly users, taller individuals, or anyone with knee or back problems. |
| Lever-Handle Taps | Single lever controls both temperature and flow. Easy to operate with a closed fist or elbow. | For individuals with arthritis, low hand strength, or motor control difficulties. |
Quick comparison
| Feature | Fixed Grab Bar (Professionally Installed) | Tension Pole | Suction Cup Bar |
|---|---|---|---|
| Primary Function | Load-bearing support for pulling, pushing, and fall prevention. | Floor-to-ceiling pole for balance and standing assistance. | Light balance assistance and steadying handhold only. |
| Load Capacity | 150 kg+ when anchored to studs or with proper wall anchors. | Variable, depends on ceiling/floor integrity and correct tensioning. | Minimal. Not designed for body weight support. Can detach without warning. |
| Installation | Permanent fixture drilled and sealed into the wall structure. Requires professional skill. | Pressure-mounted between floor and ceiling. No drilling required. | Sticks to smooth, non-porous surfaces via suction levers. |
| Reliability | Extremely high. The only approved method for true fall prevention. | Moderate. Can become loose over time and needs regular checking. | Very low. Prone to failure with changes in temperature, humidity, or surface imperfections. |
| Recommended Use | Essential safety for showers, baths, and toilets. | As a secondary aid in open areas away from walls. | Not recommended as a safety device. Should be avoided. |
Common mistakes to avoid
- Using a Towel Rail as a Grab Bar. This is the most common and dangerous mistake. Towel rails are mounted to hold a few kilograms at most and will rip out of the wall under a person's weight, causing a severe fall.
- Improper Anchoring. Screwing a grab bar directly into plasterboard or using simple plastic plugs is a recipe for disaster. The bar must be anchored into solid wood/metal studs or use heavy-duty anchors rated for the load.
- Wrong Placement. Installing a bar too high, too low, or in a location where it isn't useful for an intended movement makes it ineffective. Its position must be ergonomic and intuitive for the user.
- Choosing a Slippery Finish. A beautiful, highly polished grab bar can be treacherous when wet. Always prioritise grip over aesthetics; a brushed or peened finish is a much safer choice in a shower.
- Ignoring the Surrounding Environment. A grab bar is only one part of the safety system. Neglecting to address slippery floors, poor lighting, or high bathtub curbs means the bathroom remains a hazardous space.
- Trusting Suction Cup Bars. These are often marketed as an easy solution, but they provide a false sense of security. They are not designed to hold body weight and can detach suddenly and without warning. I never recommend them.
- DIY Installation without Experience. While I admire the DIY spirit, installing a grab bar is a safety-critical task. The risk of getting it wrong is too high. It's a job best left to professionals who understand wall structures and proper anchoring techniques.
Pre-project checklist
- Assess the primary user’s needs: What specific movements are difficult (e.g., standing from the toilet, stepping into the bath)?
- Measure your bathroom and sketch a simple floor plan.
- Mark the potential locations for grab bars on the wall with masking tape and simulate using them.
- Use an electronic stud finder to identify the location of wall studs.
- Inspect your wall and floor surfaces. Are the tiles slick? Is there any existing water damage?
- Research grab bar materials and finishes that suit your needs and decor.
- Consider other safety features: Would a shower seat or non-slip flooring be beneficial?
- Decide if a simple installation is enough or if a larger renovation is required.
- Consult with a professional renovation company like Mudelar for an on-site assessment.
- Make a list of questions to ask your installer about their process and the hardware they use.
How Mudelar handles it
At Mudelar, we approach every bathroom safety project with the seriousness it deserves. Our process is turnkey and client-focused, ensuring a result that is not only safe and compliant but also beautifully integrated into your home. It begins with a thorough on-site consultation where one of our project managers, like myself, will listen to your needs, assess the physical capabilities of the users, and survey the existing bathroom structure. We don't just sell you a product; we design a complete safety solution for your specific circumstances, whether you're in a modern apartment in Porto or a traditional house in Sintra.
Our experienced installation teams handle everything from locating studs and using the correct heavy-duty anchors to drilling cleanly through expensive porcelain and perfectly waterproofing every fixture. We build safety into the walls and floors, ensuring every component we install is reliable for years to come. For a comprehensive overview of how we can transform your space, see our services or learn more about us. When you're ready to prioritise safety without compromising on quality, the next step is to request a free quote.
Frequently asked questions (FAQ)
How high should a grab bar be installed?
For horizontal grab bars, the standard mounting height is between 84 cm and 91 cm from the finished floor to the top of the bar. This accommodates most adults for support next to a toilet or in a shower. However, we always recommend customising this height based on the primary user's stature and specific mobility needs for optimal comfort and leverage. A vertical bar at a shower entrance is typically placed so the centre is easy to reach.
Do I need a permit for installing grab bars in Lisbon?
No, you do not typically need a municipal permit (licença) in Lisbon or any other Portuguese city simply to install grab bars in an existing bathroom. This is considered a minor interior alteration. However, if the installation is part of a larger renovation that involves changing plumbing, electrical systems, or structural walls, a permit may be required. We can advise you on this during our initial consultation.
Can grab bars be installed on tile walls?
Yes, absolutely. This is one of the most common installations we perform. It requires specialised diamond-tipped drill bits to create clean holes without cracking the tile. The crucial step is what lies behind the tile. The bar must be anchored securely to the wall stud or, in the case of brick or concrete, with appropriate heavy-duty masonry anchors. The final step is to seal the fixture with silicone to prevent water infiltration.
What is the difference between a grab bar and a towel rail?
This is a critical safety distinction. A grab bar is an engineered safety device made from heavy-gauge metal with strong mounting flanges, designed and tested to support a load of at least 150 kg. A towel rail is a decorative accessory designed only to hold the light weight of a towel. Its construction and mounting hardware are completely inadequate for supporting a person's weight and it will fail under stress.
How do you maintain stainless steel grab bars?
Maintaining stainless steel grab bars is quite simple. For routine cleaning, use a soft cloth with mild soap and water. To prevent water spots, especially in hard water areas, it's good practice to wipe them dry after use. For a deeper clean or to restore shine, you can use a specialised stainless steel cleaner, applying it in the direction of the grain for brushed finishes. Avoid abrasive pads or harsh chemicals like bleach, which can damage the surface.
Are suction cup grab bars safe?
No. I strongly advise against using suction cup grab bars as a safety device. They are not designed to support a person's body weight. Their holding power can be compromised by temperature changes, humidity, soap residue, or tiny imperfections in the wall surface. They can detach from the wall suddenly and without warning, leading to a serious fall. They should only be considered for very light balance assistance, but never for critical support.
What length grab bar is best for a shower?
A 60cm grab bar is a versatile and popular choice for horizontal placement on the long wall of a shower or bath. For vertical placement near the shower entrance, a 45cm bar is often sufficient. For the wall with the controls, a 40cm or 45cm bar can work well. The best length ultimately depends on the size of the shower, the tile layout, and the specific needs of the user. An L-shaped combination bar can also be an excellent solution for corners.
How can I make my bathroom safer for the elderly?
Start with the basics: install professionally-anchored grab bars next to the toilet and in the shower/bath. Replace slippery flooring with certified non-slip tile (R10 rating or higher). Improve lighting to eliminate shadows. Add a shower seat and a handheld showerhead. Consider a 'comfort height' toilet. For a major improvement, converting a bathtub to a low-threshold or walk-in shower removes a significant tripping hazard. A full assessment by a professional is the best way to create a comprehensive safety plan.
Conclusion
Investing in grab bars and bathroom safety features is one of the most practical and caring decisions you can make for your home and family. It’s about creating a space where everyone, regardless of age or mobility, can feel secure and independent. From choosing the right materials and ensuring perfect placement to the critical, non-negotiable step of professional installation, every detail matters. Don't leave your safety to chance or weak solutions. My team and I have spent years perfecting this process across Portugal, ensuring every installation gives our clients lasting peace of mind. If you're ready to make your bathroom a safer space, I encourage you to request a free quote and let us show you how it's done right.
Ready to start your renovation?
Request a free, no-commitment quote. We reply within 24 hours.
Request a quoteLer em português: Barras de apoio para casa de banho: Guia completo 2026 | Mudelar