
28 August 2026
Kitchen Island with Stools: Sizing Guide for 2026 | Mudelar
Planning a kitchen island with stools? Our 2026 expert guide covers dimensions, stool height, and ergonomic rules for perfect comfort and flow. Get a free quote.
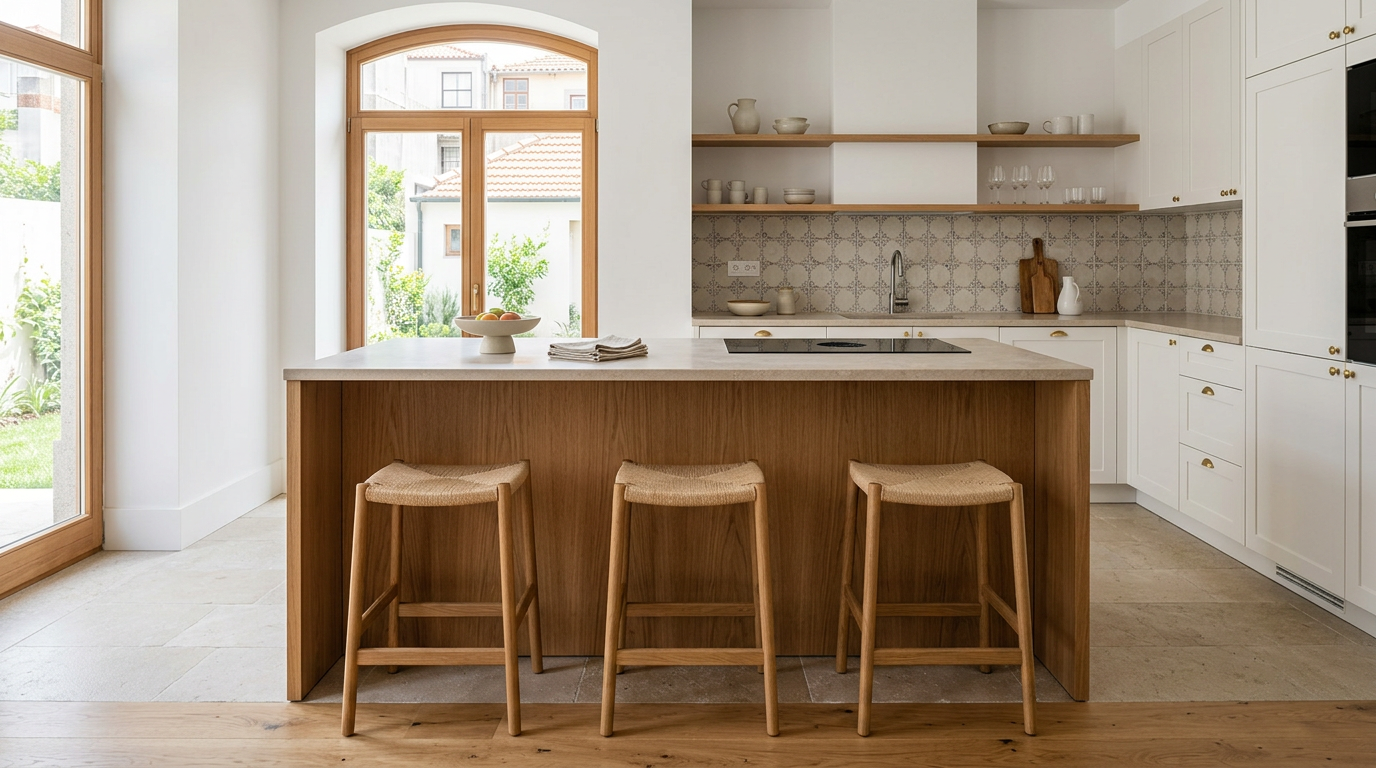
As a technical lead at Mudelar, I’ve overseen countless kitchen renovations across Porto and northern Portugal. A perfectly designed kitchen island with stools is often the centrepiece that transforms the space. However, getting it right is about more than just looks; it's a science of ergonomics, dimensions, and flow. An island that’s too large can cripple a kitchen’s functionality, while one with poorly planned seating is simply uncomfortable. In this comprehensive guide, I’ll walk you through the essential measurements, material considerations, and ergonomic principles we use to create beautiful, comfortable, and highly functional kitchen islands that become the true heart of the home for our clients.
Quick summary
- Match Heights Correctly: The most critical step is matching your stool height to the island's height. Counter-height islands (~91 cm) need counter stools, while taller bar-height islands (~106 cm) require bar stools.
- Prioritise Legroom: A comfortable seating experience depends on a sufficient countertop overhang. Plan for a minimum of 30-38 cm for counter height and 25-30 cm for bar height to allow for comfortable knee space.
- Allocate Personal Space: To avoid feeling cramped, allow for 60-75 cm of width for each seating spot. This provides enough elbow room for dining and socialising.
- Ensure Proper Traffic Flow: Maintain clear walkways of at least 90 cm around the island. In high-traffic zones or areas with appliances, this should increase to 100-115 cm.
- Think Ergonomically: For long-term comfort, choose stools with features like footrests and back support, especially if the island is your primary dining area.
- Plan for Integrated Functions Early: If you want a sink, cooktop, or electrical outlets in your island, these must be planned from the very beginning of the design phase.
- Select Materials for Your Lifestyle: The durability of your countertop, from engineered quartz to solid wood, will define the island's longevity and maintenance requirements.
Table of contents
- Understanding the Fundamentals: Island Height and Stool Types
- The Critical Role of Dimensions and Clearances
- Ergonomics for Comfort: Beyond the Basic Numbers
- Integrating Functions into Your Kitchen Island
- Material Selection for Durability and Style
- Step-by-Step Design Process for Your Island
Understanding the Fundamentals: Island Height and Stool Types
One of the first decisions in planning a kitchen island with stools is determining the height. This single choice dictates the type of stools you'll need and the overall feel of the space. There are three standard heights, each serving a slightly different purpose and ergonomic function. Getting this relationship right is fundamental to the success of your kitchen design.
Counter-height islands are the most common choice in modern homes, from new builds in Lisbon to renovated apartments in Porto. They stand at the same height as the rest of your kitchen counters, typically 90-92 cm. This creates a seamless, unified look and allows the island to double as an extra food preparation surface. The corresponding stools for this height are called "counter stools," and their seat height should be between 60-67 cm. This leaves the ideal 23-30 cm gap for comfortable leg movement.
Bar-height islands are taller, usually around 105-110 cm. This height creates a more distinct, café-like separation between the kitchen work area and the social space, which can be very effective in open-plan living areas. You will need "bar stools" with a seat height of 70-77 cm for this setup. While visually striking, some people find them less comfortable for long periods and less accessible for children or the elderly. However, for a dedicated social hub, they are an excellent choice.
Finally, you can incorporate a table-height section into your island, which sits at a standard dining table height of 75-76 cm. This is achieved by dropping a portion of the island's surface. It allows for the use of standard dining chairs (seat height ~45 cm), making it the most comfortable and accessible option for family meals. This multi-level design offers great versatility but requires a larger island footprint to execute properly.
The Critical Role of Dimensions and Clearances
In kitchen design, centimetres matter. The success of a kitchen island with stools hinges on precise measurements that ensure comfortable use and efficient movement. We call these clearances and they are non-negotiable for a functional layout. Before you fall in love with a massive island, you must ensure you have the space to accommodate it without creating frustrating bottlenecks.
Walkway Clearance: The 90-100-115 Rule
The space around your island is just as important as the island itself. We follow a simple rule for determining minimum walkway clearance:
- 90 cm: This is the absolute minimum clearance for a walkway behind seating or in a low-traffic area. It allows one person to walk through comfortably.
- 100 cm: This is the recommended minimum for a work aisle, such as the space between your island and your main run of cabinets with the sink or oven. It allows you to open appliance doors and drawers without completely blocking the path.
- 115 cm+: This is the ideal clearance for a true two-person kitchen or a major thoroughfare, allowing people to pass each other with ease. In many of the family homes we renovate in areas like Cascais or Braga, this generous spacing is a priority.
Seating Clearance: Width and Depth
Once you've established the walkways, you need to plan the seating area itself. This involves two key measurements: width per person and depth for legroom (overhang).
For width, the industry standard is to allow 60 cm per stool. This provides enough elbow room for a person to eat without bumping into their neighbour. If you want a more generous and luxurious feel, or if your stools are particularly wide or have armrests, I recommend increasing this to 70-75 cm per person. To calculate how many stools you can fit, simply measure the length of the seating side of your island and divide by your chosen width per person.
For depth, the countertop overhang is crucial for knee space. A shallow overhang forces people to sit sideways or perch on the edge of the stool. For a counter-height island (90 cm), aim for a 30-38 cm overhang. For a taller bar-height island (106 cm), you can get away with slightly less, around 25-30 cm, as people tend to sit more vertically.
Ergonomics for Comfort: Beyond the Basic Numbers
While dimensions and clearances provide the blueprint for a functional kitchen island, true comfort comes from focusing on ergonomics. This is about designing the seating area to support the human body, preventing fatigue and encouraging people to linger. A well-designed kitchen island with stools is an invitation to sit and connect, and that experience is defined by these finer details.
At Mudelar, we believe that an island shouldn't just look good in a photo; it needs to feel good when you use it every day. This means considering how a person sits, where their feet rest, and the support their back receives. These details transform a simple counter into a favourite gathering spot for family and friends.
The Importance of Countertop Overhang
We touched on overhang dimensions, but its ergonomic impact is worth emphasising. The overhang allows you to tuck your knees comfortably underneath, enabling you to sit squarely facing the island. Without it, you are forced to straddle the island's base or sit uncomfortably far back. The recommended 30-38 cm for counter height isn't arbitrary; it's based on the average person's thigh length. Sacrificing this space to save a few centimetres is one of the most common and regrettable mistakes I see. We always ensure our designs, whether using robust Silestone or elegant natural wood, incorporate a proper overhang supported correctly to prevent sagging over time.
Choosing Stools with Proper Support
The stools themselves are the other half of the ergonomic equation. The choice depends on how you intend to use the island:
- Backless Stools: These are great for a minimalist look and can be tucked completely under the overhang, saving space. They are perfect for short-term use, like having a quick breakfast or coffee. However, they offer no back support, making them unsuitable for long dinners.
- Stools with Low Backs: These offer a good compromise. They provide some lumbar support while maintaining a relatively low profile, so they don't dominate the visual landscape.
- Stools with High Backs: If your island will be your primary dining table, high-backed stools are the most comfortable option. They provide full support and are designed for longer periods of sitting.
- Footrests: A built-in footrest on the stool is an ergonomic essential. It allows you to take the pressure off your legs and promotes better posture. The ideal height for a footrest is about 40-45 cm below the seat.
Integrating Functions into Your Kitchen Island
A modern kitchen island is rarely just a block with a countertop. It's a multifunctional hub that can house appliances, sinks, storage, and charging stations. Planning for these functions from the outset is crucial for a successful design. Deciding on the island's purpose—be it for cooking, cleaning, dining, or all three—will dictate its size, shape, and internal requirements. This is a core part of the planning process for every project we undertake, from Setúbal to Aveiro.
Planning for Electrical and Plumbing
If you dream of having a second sink for prep, a wine fridge, a dishwasher, or a cooktop in your island, you must plan for plumbing and electrical services early. Running these lines requires careful coordination and often means channeling into the floor slab. This is significantly easier and more cost-effective to do during a full renovation than as an afterthought. We also strongly recommend integrating electrical outlets into the island. Pop-up outlets or outlets hidden on the side panels are perfect for charging laptops and phones or using small appliances. In today's connected world, a kitchen island with stools without charging ports is a missed opportunity.
Storage Solutions Underneath
Don't let the space under your island go to waste. The side opposite the seating area is prime real estate for storage. You can opt for deep drawers, which are more ergonomic and accessible than deep cupboards, for storing pots and pans. Alternatively, standard cabinets are perfect for less-frequently used items. Even the shallow space under the seating overhang can sometimes be utilized for narrow, 'touch-to-open' cabinets for items like placemats or chargers. A well-designed island can significantly increase your kitchen's overall storage capacity.
Material Selection for Durability and Style
The materials you choose for your kitchen island's countertop and stools have a massive impact on its aesthetics, durability, and maintenance. Your choice should be guided by your lifestyle, how you use your kitchen, and your personal taste. At Mudelar, we guide clients through these choices, ensuring the materials are not only beautiful but also practical for their needs.
Countertop Materials: From Quartz to Wood
The countertop is the workhorse of the island. It needs to withstand daily use, from food prep to homework sessions. Engineered quartz brands like Silestone and Compac are incredibly popular in Portugal for good reason. They are non-porous, meaning they resist staining from wine and olive oil, and are highly scratch-resistant. For those seeking ultimate durability, ultra-compact surfaces like Dekton offer superior resistance to heat and scratches. Natural stone like granite provides a unique, one-of-a-kind look, while a solid wood or butcher-block top adds warmth and character, though it requires more maintenance.
Stool Materials: Upholstery and Frame Choices
The materials of your stools affect both comfort and longevity. For frames, metal offers a sleek, industrial, or modern look, while wood provides warmth and a more traditional or rustic feel. When it comes to the seat, an un-upholstered wood or moulded plastic seat is easy to clean but can be hard for long sittings. Upholstered seats in fabric, leather, or high-quality synthetic leather add a significant layer of comfort. When choosing fabric, consider performance fabrics that are stain-resistant and easy to clean, especially if you have children. The right combination will complement your kitchen island with stools and the overall design of your home.
Step-by-Step Design Process for Your Island
Request a free, no-commitment quote. We reply within 24 hours.
Request a quote →Designing the perfect kitchen island can feel overwhelming, but breaking it down into a logical process makes it manageable. This is the same approach we take at Mudelar to ensure every detail is considered and the final result meets our clients' expectations perfectly.
Phase 1: Defining the Island's Purpose
First, ask yourself: what is the primary job of this island? Is it mainly for extra counter space and food prep? Will it be the main family dining spot? Is it a social hub for entertaining guests with a glass of wine? Or is it a combination of all three? Your answer will determine the island's features. An island for dining needs comfortable seating and a large, clear surface. A prep-focused island might benefit from a small sink. A social hub might feature a wine fridge or a raised bar section. Be honest about how you will live in the space.
Phase 2: Mapping Your Kitchen Layout
Once you know its purpose, it's time to test the fit in your actual kitchen. This is a step you cannot skip. Get some painter's tape or use cardboard boxes to create a physical mock-up of the island on your floor. Mark out the full dimensions, including the seating overhang. Then, live with it for a day or two. Walk around it. Open your fridge, oven, and dishwasher doors. Pretend to cook a meal. Sit at the 'island' on a chair. This real-world test will immediately reveal if your proposed dimensions are comfortable or if they create an awkward, cramped space. It's far better to adjust the tape on the floor than to live with a permanent design flaw.
Recommended materials and options
| Type | Features | When to choose |
|---|---|---|
| Engineered Quartz | Non-porous, scratch & stain resistant, vast colour selection (e.g., Silestone) | For a high-use, low-maintenance surface that combines durability with premium aesthetics. |
| Ultra-Compact Surface | Extremely resistant to heat, UV, scratches, and stains (e.g., Dekton) | For ultimate durability, outdoor kitchens, or when you want a seamless look for countertops and cladding. |
| Natural Granite | Unique patterns, highly heat resistant, very durable | When you want a one-of-a-kind natural stone piece and a workhorse surface for a busy kitchen. |
| Solid Wood (Butcher Block) | Warm, natural aesthetic, can be sanded and refinished, kind to knives | For a rustic, traditional, or warm modern look, and if you enjoy the character natural materials develop. |
| High-Pressure Laminate (HPL) | Wide range of decors (wood, stone), good performance, consistent appearance | When you need a durable and versatile surface with many design options, often used in projects in Lisbon. |
Quick comparison
| Island Height | Ideal Stool Seat Height | Best For |
|---|---|---|
| Counter Height (90-92 cm) | 60-67 cm | Casual dining, food prep, and achieving a seamless look with the main counters. The most common setup. |
| Bar Height (105-110 cm) | 70-77 cm | Creating a distinct 'bar' feel, separating spaces in open-plan layouts, and for a more social vibe. |
| Table Height (75-76 cm) | 45-48 cm (a dining chair) | Family dining, maximum comfort for long meals, and improved accessibility for children and the elderly. |
Common mistakes to avoid
- Ignoring Traffic Flow. The most common mistake is making the island too big for the room. This creates tight walkways that make the kitchen frustrating to work in. Always respect the minimum 90-100 cm clearance rule.
- Mismatching Island and Stool Height. Buying 'bar stools' for a 'counter-height' island (or vice versa) is a classic error. This results in an uncomfortable seating position that is either too high or too low.
- Skimping on the Overhang. An overhang of less than 25 cm is simply not enough for comfortable seating. People will be forced to sit sideways, defeating the purpose of the seating area.
- Cramming in Too Many Stools. Don't try to fit four stools in a space meant for three. Overcrowding makes for an unpleasant dining experience. Stick to the 60-75 cm of width per person rule.
- Forgetting Task Lighting. A kitchen island needs dedicated lighting. A row of pendant lights or focused spotlights not only enhances the aesthetic but provides crucial task lighting for chopping or reading.
- Neglecting Electrical Outlets. In the 21st century, an island without power is a design failure. Plan for at least one or two outlets for charging devices and using small appliances.
- Choosing Impractical Materials. Falling in love with a porous marble countertop when you have a young family that loves red sauces can lead to heartbreak. Choose materials that align with your actual lifestyle and tolerance for maintenance.
Pre-project checklist
- Measure the total length and width of your kitchen space.
- Define the primary, secondary, and tertiary functions of your island (e.g., 1. Dining, 2. Prep, 3. Social).
- Determine the number of seats you need on a daily basis.
- Use painter's tape to mark the island's proposed footprint and walkways on the floor.
- Walk around the taped-off area for a day to test the flow and clearances.
- List all integrated features you want: sink, cooktop, dishwasher, wine fridge, outlets, USB ports.
- Analyse your kitchen's 'work triangle' (sink-fridge-oven) and how the island will affect it.
- Decide on your preferred island height: counter, bar, or a multi-level combination.
- Research stool styles and decide on your preference: backless, low-back, or high-back.
- Gather inspiration images of countertop materials that fit your home's aesthetic and your lifestyle's durability needs.
How Mudelar handles it
At Mudelar, we take the guesswork out of designing the perfect kitchen island with stools. Our turnkey renovation process begins with a thorough consultation where we listen to your needs and analyse your space. We then create detailed 3D renderings, allowing you to see exactly how the island will look and function in your kitchen, from the clearances to the material finishes. This crucial step ensures there are no surprises.
Our experienced team handles everything from the structural work and utility routing to sourcing high-quality materials from trusted partners like Silestone and Grohe. We manage the entire project, ensuring every dimension is precise and every ergonomic principle is followed, whether we're working on a compact apartment in central Lisbon or a spacious villa in the Algarve. The result is a beautiful, functional, and perfectly integrated centrepiece for your home. You can learn more about our services or read about our approach about us, but the best way to start is to request a free quote.
Frequently asked questions (FAQ)
How much space do you need for a kitchen island with seating?
You need enough space for the island itself plus adequate clearance around it. We recommend a minimum walkway of 90-100 cm on all sides. So, for a 90 cm deep island, the room needs to be at least 2.7m wide to accommodate it comfortably with just a walkway on one side.
What is the standard height for a kitchen island stool?
There isn't one single standard. For a counter-height island (90-92 cm), you need a 'counter stool' with a seat height of 60-67 cm. For a taller bar-height island (105-110 cm), you need a 'bar stool' with a seat height of 70-77 cm. Always measure your island first.
How much overhang should a kitchen island have for seating?
For comfortable knee space, a counter-height island should have an overhang of 30-38 cm. A bar-height island can have a slightly smaller overhang of 25-30 cm. Anything less than 25 cm will feel cramped and uncomfortable for most adults.
Do I need a back on my kitchen island stools?
It depends on the intended use. For quick, short-term sitting, backless stools are fine and save space. If you plan to eat full meals or work at the island for extended periods, a stool with a low or high back is essential for comfort and proper posture.
How many stools can I fit at my kitchen island?
To calculate this, measure the total length of your island's seating edge. Divide that number by 60 cm for a snug fit or by 75 cm for a more spacious arrangement. For example, a 180 cm long island can comfortably accommodate three stools spaced at 60 cm each.
Can I put a cooktop on a kitchen island with seating?
Yes, but it requires careful safety planning. You need adequate clearance between the heat source and the seating area (at least 30-40 cm), and robust overhead or downdraft ventilation is essential. It also changes the dynamic, making it more of a performance area than a casual dining spot.
What's the difference between counter height and bar height?
Counter height is the same as your standard kitchen work surfaces, about 90-92 cm from the floor. Bar height is significantly taller, around 105-110 cm. The choice affects the type of stool you need, the overall look of your kitchen, and the feeling of the seating area.
How do I choose the right lighting for my kitchen island?
Island lighting should be both functional (task lighting) and beautiful (ambient lighting). A row of two or three pendant lights is a classic and effective choice. The bottom of the pendants should hang about 75-90 cm above the countertop to provide illumination without blocking sightlines.
Conclusion
A well-executed kitchen island with stools is more than just a piece of furniture; it is the functional and social anchor of a modern home. As we've explored, achieving this requires a thoughtful approach that balances aesthetics with the science of ergonomics and spatial planning. From selecting the correct height and ensuring ample clearance to choosing durable materials and comfortable stools, every detail matters. This planning is the key to creating a space that you and your family will love and use for years to come. If you're ready to transform your kitchen in Porto, Lisbon, or anywhere in Portugal, our team at Mudelar is here to help you get every detail right. Request a free quote today, and let's start designing the heart of your home together.
Ready to start your renovation?
Request a free, no-commitment quote. We reply within 24 hours.
Request a quoteLer em português: Ilha de Cozinha com Bancos: Guia de Medidas 2026 | Mudelar