
26 August 2026
Kitchen Island with Stools: The 2026 Sizing Guide | Mudelar
Planning a kitchen island with stools? Our guide covers ideal dimensions, stool heights, and ergonomic layouts for comfort and style in Portugal. Get a free quote.
As a technical lead at Mudelar, I've overseen countless kitchen renovations across Porto and the north. One feature that consistently transforms a space is a well-designed kitchen island. But its success hinges on more than just looks. A kitchen island with stools must be a perfect blend of form and function, a hub for everything from morning coffee to evening homework. The secret lies in ergonomics and precise measurements. Get it wrong, and you have a beautiful but awkward obstacle. Get it right, and you create the true heart of your home. This guide will walk you through the critical sizing and ergonomic considerations to ensure your new island is comfortable, practical, and perfectly suited to your life.
Quick summary
- Choose the Right Height: Your island can be at standard counter height (90-92 cm) for a seamless look or bar height (105-110 cm) to create a distinct social zone.
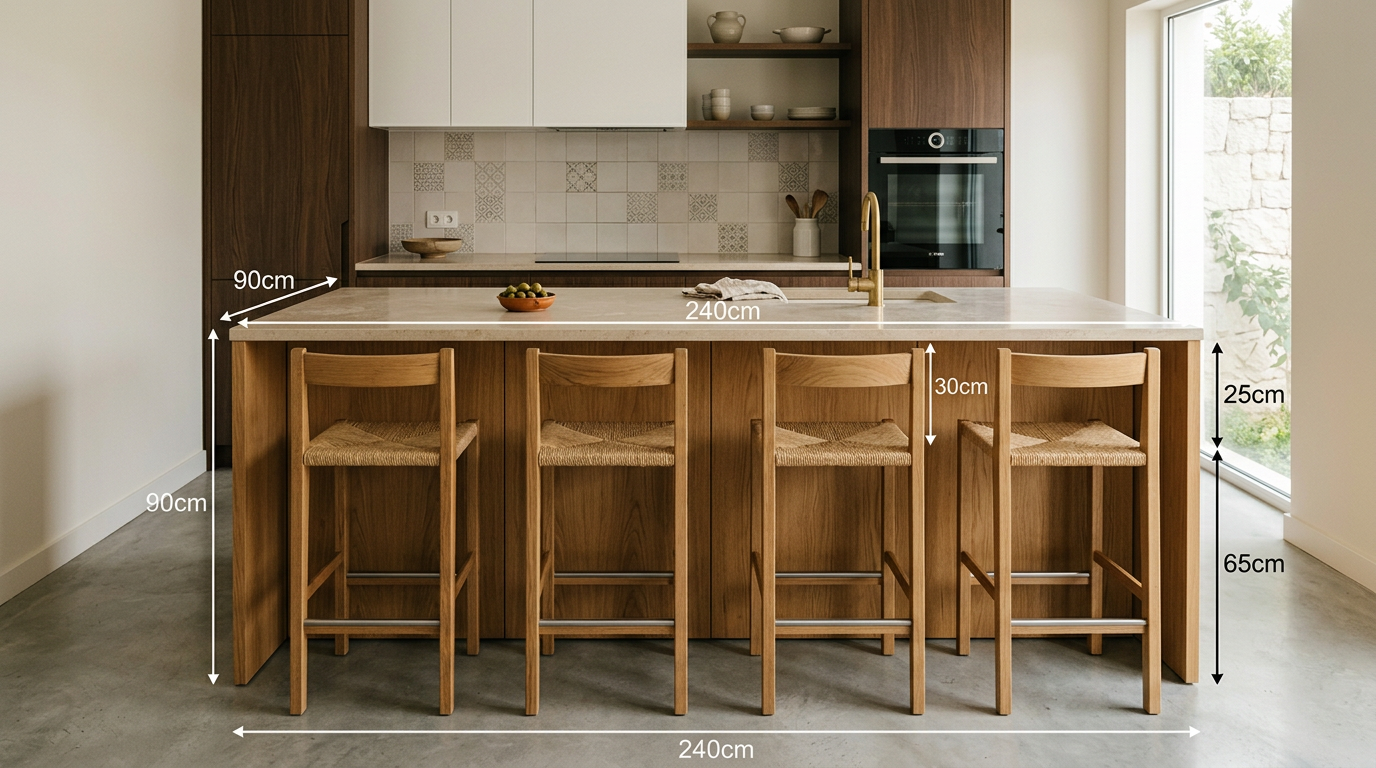
- Prioritise Knee Space: For comfortable seating, ensure a minimum countertop overhang of 35-40 cm for counter-height and 25-30 cm for bar-height islands.
- Calculate Seating Width: Allow at least 60 cm of width per stool to provide adequate elbow room and prevent diners from feeling cramped.
- Mind the Gap: The ideal vertical distance between the stool seat and the underside of the countertop is 25-30 cm for optimal leg comfort.
- Ensure Proper Clearance: Maintain at least 90-100 cm of clear walkway space around the island for safe and efficient traffic flow, especially in work zones.
- Integrate Functionality: Plan for electrical outlets, USB ports, and task lighting early in the design process to maximise the island's utility.
- Match Stools to Island: Select stools with the correct height (counter or bar) and features (backrest, swivel) that match your comfort needs and available space.
Table of contents
- Understanding the Core Functions of a Kitchen Island
- Critical Dimensions: Getting Your Kitchen Island Height Right
- Ergonomics for Seating: How Much Space Do You Really Need?
- Planning Clearances and Walkways Around Your Island
- Integrating Appliances and Utilities into Your Island
- Choosing the Right Stools for Your Island
- Recommended materials and options
- Quick comparison
- Common mistakes to avoid
- Pre-project checklist
- How Mudelar handles it
- Frequently asked questions (FAQ)
- Conclusion
Understanding the Core Functions of a Kitchen Island
A modern kitchen island is far more than an extra work surface. In homes from Lisbon to Braga, it has evolved into the multifunctional centrepiece of daily life. Its primary purpose is defined by your lifestyle. For some, it's a dedicated food preparation zone, complete with a second sink or a hob. For others, it's the social hub—a place for casual meals, after-school snacks, or catching up with friends over a glass of wine. A well-planned kitchen island can also provide a significant amount of much-needed storage.
Before diving into measurements, you must define the island's role. Will it be primarily for work, dining, socialising, or storage? Often, it's a combination of all four. This decision will directly influence its size, shape, and features. For instance, an island designed for dining requires a significant countertop overhang for comfortable seating, while one focused on cooking needs heat-resistant surfaces and appropriate ventilation. Clarifying its function is the first, most crucial step in the design process.
Critical Dimensions: Getting Your Kitchen Island Height Right
The height of your kitchen island is the foundational measurement that dictates everything else, especially your choice of stools. There are two primary standards, each with its own ergonomic and aesthetic implications. The choice between them depends entirely on how you intend to use the space. As we guide our clients in the Aveiro and Porto areas, we always start this conversation by mapping function to form.
Standard Counter Height Islands (90-92 cm)
This is the most popular choice. At 90-92 cm, the island matches the height of your main kitchen counters, creating a cohesive, streamlined look. This consistency extends the functional worksurface, making it ideal for food prep, baking, or setting out a buffet. It's an excellent ergonomic choice for tasks performed while standing. Seating at this height requires counter-height stools, which are generally very comfortable for people of all ages and are easy to get in and out of.
Bar Height Islands (105-110 cm)
A bar-height island stands taller than the main counters, typically between 105 cm and 110 cm. This height creates a clear visual separation between the kitchen's work zone and the social/dining area. It's excellent for entertaining, evoking a more casual, bar-like atmosphere. The higher surface can also help hide kitchen clutter from the view of an adjoining living or dining room. This option requires taller bar-height stools and is often preferred in open-plan living spaces in new builds around Setúbal.
Two-Tiered (Split-Level) Islands
A two-tiered or split-level island attempts to offer the best of both worlds. It features a lower section at counter height (90-92 cm) for food prep and a raised section at bar height (105-110 cm) for dining and socialising. The raised tier acts as a backsplash for a sink or hob on the lower level and shields the working part of the kitchen from view. While versatile, this design reduces the available continuous workspace and can sometimes feel visually cluttered. Careful planning is needed to ensure both levels are large enough to be functional.
Ergonomics for Seating: How Much Space Do You Really Need?
Comfort is not a luxury; it's a necessity for any seating area you plan to use regularly. A kitchen island with stools that ignores ergonomic principles will quickly be abandoned. The key is to provide adequate space for legs, knees, and elbows. These measurements are non-negotiable for creating an inviting and usable dining spot.
Calculating Knee and Leg Room (Depth)
The countertop overhang is the most critical measurement for seating comfort. This is the portion of the countertop that extends beyond the island's base, creating space for your knees. The required depth depends on the island's height:
- For a counter-height island (90 cm), you need a minimum overhang of 35-40 cm.
- For a bar-height island (105 cm), a slightly smaller overhang of 25-30 cm is sufficient, as people tend to sit more upright.
Skimping on this dimension is a common mistake that forces people to sit sideways or perch uncomfortably on the edge of the stool. Always err on the side of providing more room, not less.
Allocating Width Per Stool
Elbow room is just as important as legroom. To avoid diners bumping into each other, you must allocate enough horizontal space for each seat. The industry standard is a minimum of 60 cm of width per person. For extra comfort or if you plan to use larger, swivelling stools with armrests, we at Mudelar often recommend increasing this to 70-75 cm per person. To calculate the total number of stools your island can accommodate, simply measure the length of the seating side and divide by this number.
Stool Height vs. Island Height: The Golden Rule
The relationship between the stool seat and the countertop is crucial for comfortable dining. The golden rule is to leave a gap of 25-30 cm between the top of the stool's seat and the underside of the island countertop. This provides ample space for your thighs without forcing you to reach up to the counter.
- For a 90 cm counter, look for stools with a seat height of 60-65 cm.
- For a 105 cm bar, you'll need stools with a seat height of 75-80 cm.
Always measure from the floor to the *underside* of the countertop, not the top surface, when checking this clearance.
Planning Clearances and Walkways Around Your Island
A kitchen island should improve flow, not obstruct it. Proper clearance—the empty space around the island—is essential for a safe and functional kitchen. We use tape on the floor during our on-site consultations in places like Cascais and Oeiras to help clients visualise these pathways. It’s a simple trick that prevents major design regrets later on. You must consider three distinct clearance zones.
The Work Aisle (Between Island and Main Counters)
The aisle between your island and your main run of cabinets (containing the sink, cooker, or refrigerator) is your primary work zone. This space needs to be wide enough for you to work comfortably, open appliance doors fully (like ovens and dishwashers), and for another person to pass by. We recommend a minimum clearance of 100 cm. If it’s a busy kitchen where two people often cook together, increasing this to 110-120 cm is ideal.
Walkway Clearances (Pass-through Aisles)
For aisles that are purely for foot traffic and not part of the main work triangle, you can have a slightly narrower clearance. A minimum of 90 cm is required to allow a person to walk through comfortably. Anything less will create a bottleneck and make the kitchen feel cramped, especially when carrying groceries or a tray. This is a common consideration in the slightly more compact apartment layouts we see in central Lisbon.
Seating Clearance (Behind the Stools)
If you have a kitchen island with stools, you must account for the space needed behind the seated person. This clearance is measured from the edge of the island's countertop to the wall or obstacle behind it.
- For a simple walkway behind the stools: Allow at least 90 cm. This gives enough space for someone to sidle past when the stools are occupied.
- For an active thoroughfare behind the stools: You'll need 110-120 cm to allow people to walk comfortably behind someone who is seated.
Forgetting this clearance is one of the most frequent design flaws we are asked to fix. It renders the seating almost useless in a busy household.
Integrating Appliances and Utilities into Your Island
A truly functional kitchen island often incorporates key utilities. Whether it's a secondary prep sink, a sleek induction hob, or simply a convenient place to charge your devices, planning for these integrations from the outset is vital. It involves coordinating with plumbers and electricians early in the project, a standard part of our turnkey service at Mudelar.
Electrical and Plumbing Considerations
Almost every island benefits from electricity. Pop-up sockets or outlets discreetly placed on the side panels are essential for using small appliances, laptops, or charging phones. We highly recommend including sockets with integrated USB-A and USB-C ports. If you're adding a sink or dishwasher, plumbing lines (water supply and drainage) must be run through the floor before the final flooring and cabinetry are installed. This requires careful pre-planning and is much more complex to retrofit.
Hobs and Extractors
Placing a hob on the island creates a wonderfully social cooking experience, allowing you to face your family or guests. However, it requires careful consideration of ventilation. You have several options:
- Ceiling-mounted extractor hood: A powerful and effective option, but can be visually intrusive.
- Downdraft extractor: A sleek, minimalist system that rises from the countertop when needed. These are technologically advanced but require space within the island cabinet and careful ducting plans.
- Hob with integrated extractor: The newest solution, where the extractor is built directly into the induction hob itself, offering a completely unobstructed view.
Safety is also paramount. You must ensure there is adequate non-combustible countertop space around the hob (at least 30 cm on each side) and that seating is a safe distance away from any cooking action.
Choosing the Right Stools for Your Island
The stools are the final touch that completes your kitchen island with stools. Their style contributes to the overall aesthetic, but their functional design is what determines long-term comfort and usability. The choice goes beyond just matching the height; it’s about how you and your family will use them every day.
Backrest vs. Backless Stools
- Backless Stools: These are the ultimate space-savers. They can be tucked completely under the countertop overhang, keeping walkways clear. They offer a clean, minimalist look. However, they provide no back support, making them best suited for quick meals and short periods of sitting.
- Stools with Backrests: These offer significantly more comfort and support, encouraging longer, more leisurely stays at the island. They are a better choice if the island will be your primary dining spot. The trade-off is that they are bulkier and will visually and physically occupy more space.
Swivel vs. Fixed Stools
- Swivel Stools: A swivel function makes it easier to get on and off the stool without having to drag it across the floor. This is especially useful in tighter spaces and helps protect your flooring. It also facilitates conversation, allowing seated guests to turn and engage with others in the kitchen or an adjacent room.
- Fixed-leg Stools: These are generally more stable and often have a smaller footprint. They offer a more traditional look but require more effort to move. If you choose fixed stools, we recommend adding felt pads to the feet to prevent scratches on your hardwood or tile floors.
Material Choices: Wood, Metal, and Upholstery
The materials you choose for your stools impact both their durability and maintenance. Wooden stools offer a warm, classic feel. Metal stools can provide an industrial or modern look and are very durable. Upholstered seats (in fabric or leather) provide the most comfort but require more care to protect against spills and stains, especially in a kitchen environment. Performance fabrics that are stain-resistant are a wise investment for a family kitchen.
Recommended materials and options
Request a free, no-commitment quote. We reply within 24 hours.
Request a quote →Choosing the right countertop is critical for your island's durability and style. Here are some of the materials we frequently install in projects across Portugal.
| Type | Features | When to choose |
|---|---|---|
| Engineered Quartz | Non-porous, highly resistant to stains and scratches. Consistent patterns. Brands like Silestone and Compac. | For busy family kitchens where low maintenance and high durability are the top priorities. |
| Natural Granite | Highly durable and heat-resistant. Each slab is unique. Requires periodic sealing. | When you want a one-of-a-kind natural stone look with excellent performance for cooking and prep areas. |
| Natural Marble | Unmatched classic beauty and luxurious feel. Stays cool, great for baking. | For a statement island in a home where aesthetic is paramount and you accept it will develop a patina over time. |
| Solid Wood | Warm, natural, and traditional aesthetic. Can be sanded and refinished. Requires oiling/sealing. | To create a rustic, 'butcher block' feel. Best for those who enjoy the character and maintenance of wood. |
| Compact Laminate | Slim profile (around 12mm), waterproof, and highly durable. Modern look. Brands like Egger. | For a sleek, contemporary, and minimalist design, especially when a thin-profile worktop is desired. |
Quick comparison
Here’s a quick comparison to help you decide on the ideal island height configuration for your home.
| Feature | Counter-Height Island | Bar-Height Island | Two-Tiered Island |
|---|---|---|---|
| Height | 90-92 cm | 105-110 cm | Split between 90 cm and 105 cm |
| Best For | Food prep, baking, seamless look | Entertaining, socialising, open-plan | Separating work and dining zones, hiding clutter |
| Stool Type | Counter Stool (60-65 cm seat) | Bar Stool (75-80 cm seat) | Bar Stools for the higher tier |
| Ergonomics | Comfortable for most, easy access | More perched seating, good for social | Can be awkward, reduces continuous workspace |
| Aesthetic | Cohesive, integrated with kitchen | Creates a distinct 'bar' zone | More complex, can look busy if not designed well |
Common mistakes to avoid
Over the years, we've seen a few recurring issues that can compromise an otherwise great kitchen island design. Here are the most common mistakes to avoid:
- Making the Island Too Large. An oversized island can overwhelm a kitchen, creating tight walkways and disrupting the natural flow. It's crucial to respect the clearance rules.
- Ignoring the Work Triangle. The island should not obstruct the path between the sink, refrigerator, and hob. Poor placement can make cooking a frustrating process of navigating around an obstacle.
- Choosing the Wrong Stool Height. Buying bar-height stools for a counter-height island (or vice-versa) is a frequent and entirely avoidable mistake. Always measure your island height before purchasing seating.
- Insufficient Countertop Overhang. Skimping on knee space makes seating deeply uncomfortable. An overhang of less than 25 cm is practically useless for anything other than perching.
- Forgetting About Task Lighting. A large island can cast a shadow on the work surface. Integrated pendant lights or spotlights are not just decorative; they are essential for proper task lighting.
- Neglecting Power Outlets. In today's connected world, an island without power is a missed opportunity. Plan for at least one set of outlets for charging devices and using small appliances.
- Poor Material Choices. Choosing a porous material like untreated marble for a high-use family island with kids can lead to stress and maintenance headaches. Your material choice must match your lifestyle.
Pre-project checklist
Before you commit to a design, run through this simple checklist to ensure you’ve covered all the bases for your kitchen island project.
- [ ] Measure your total kitchen footprint accurately.
- [ ] Use masking tape on the floor to mock up the island's size and its surrounding clearances.
- [ ] Define the island's primary functions: prep, dining, storage, socialising?
- [ ] Decide on the optimal height: counter, bar, or two-tiered.
- [ ] Determine the number of stools you need based on the 60 cm width-per-person rule.
- [ ] Plan the location of any necessary plumbing or electrical points.
- [ ] Choose a countertop material that balances aesthetics with your tolerance for maintenance.
- [ ] Shortlist stool styles that match your island's height and your comfort requirements (e.g., backrest, swivel).
- [ ] Plan for integrated task lighting directly above the island.
- [ ] Consider your storage needs: will you incorporate drawers, cabinets, or open shelving?
How Mudelar handles it
At Mudelar, we believe a kitchen island with stools should be the jewel in the crown of your renovation. Our turnkey approach simplifies the entire process. It begins with an in-depth consultation where we listen to your needs—how you cook, eat, and live. We then translate this into a functional and beautiful design, creating detailed 3D models so you can visualise every dimension, clearance, and finish before construction begins. Our team of experts helps you select the perfect materials, from a durable Silestone countertop to the ergonomic stools that complete the look.
We coordinate all the technical aspects, from routing the plumbing for an island sink to installing recessed power outlets and elegant pendant lighting. Our dedicated project managers in Porto, Lisbon, and beyond ensure that every detail is executed flawlessly, delivering a stunning and perfectly proportioned kitchen island that truly enhances your home. To start your journey, get a free quote and explore our services. You can learn more about our philosophy on our about us page.
Frequently asked questions (FAQ)
How high should a kitchen island be for stools?
A standard kitchen island is counter height, which is 90-92 cm tall. This requires counter-height stools with a seat height of around 60-65 cm. Alternatively, a bar-height island is 105-110 cm tall and needs bar-height stools with a seat height of 75-80 cm. The choice depends on whether you want a seamless workspace or a distinct social area.
What is the standard space between a stool and an island?
For optimal comfort, you should aim for a gap of 25-30 cm between the top of the stool's seat and the underside of the island's countertop. This provides sufficient legroom without making the counter feel too high or too low while you are seated. Always measure your counter's underside height before buying stools.
How much overhang should a kitchen island have for seating?
The amount of countertop overhang needed for comfortable seating depends on the island's height. For a 90 cm counter-height island, you need a minimum of 35-40 cm of clear knee space. For a taller, 105 cm bar-height island, a slightly smaller overhang of 25-30 cm is generally sufficient.
Can you put a kitchen island in a small kitchen?
Yes, but it requires careful planning. A slim, mobile island or a small peninsula attached to a wall can work well. The key is to maintain adequate clearances—at least 90 cm for walkways. In a very small kitchen, a movable butcher's block or kitchen cart can provide extra workspace and flexibility without permanently obstructing the room.
What is the difference between a counter stool and a bar stool?
The primary difference is height. Counter stools are shorter, with a seat height of 60-65 cm, designed for use at a standard 90 cm kitchen counter. Bar stools are taller, with a seat height of 75-80 cm, intended for a 105-110 cm high bar or bar-height island. Using the wrong type will result in an uncomfortable, awkward seating position.
How much space do you need behind a kitchen island with stools?
This depends on the function of the space behind the seating. If it's just a wall, you need at least 90 cm from the counter's edge to the wall to allow people to get in and out of the stools. If it's a major walkway or thoroughfare, you should plan for 110-120 cm to allow others to pass comfortably behind a seated person.
Is a two-tiered kitchen island a good idea?
It can be, but it has trade-offs. A two-tiered island is great for hiding kitchen mess from an adjacent living area and clearly delineates the cooking and socialising zones. However, it breaks up the continuous flat surface, reducing the usable workspace for large projects like baking or serving a buffet. The decision depends on your priorities.
How do I choose the right countertop material for my island?
Consider your lifestyle. For a busy family, a low-maintenance, stain-resistant material like engineered quartz (Silestone, Compac) is ideal. If you love a natural, unique look and are diligent with maintenance, granite is a great choice. For a statement piece where aesthetics are paramount, marble is beautiful but requires care. Explore our blog for more material guides.
Conclusion
Designing the perfect kitchen island with stools is a game of centimetres. By focusing on ergonomic principles and precise measurements for height, seating space, and clearances, you can create a feature that is not only beautiful but immensely practical. It’s about ensuring comfort, promoting easy movement, and tailoring the island to your specific needs, whether that’s cooking, dining, or socialising. This meticulous planning is what elevates a good kitchen into a truly great one, forming the vibrant, functional heart of your home in Portugal.
If you’re ready to create a kitchen perfectly tailored to your life, our team at Mudelar is here to help. Request a free quote today and let's start designing the kitchen you've always wanted.
Ready to start your renovation?
Request a free, no-commitment quote. We reply within 24 hours.
Request a quoteLer em português: Ilha de Cozinha com Bancos: Medidas Ideais em 2026 | Mudelar