
09 September 2026
Kitchen Island with Stools: The 2026 Sizing Guide | Mudelar
Planning a kitchen island with stools? This guide covers ideal dimensions, stool heights, and ergonomic layouts for your Portugal home. Get a free quote!
As a project manager at Mudelar, I’ve overseen countless kitchen renovations across Lisbon and Porto, and the one feature everyone desires is a functional kitchen island. A kitchen island with stools is more than just extra counter space; it's the new heart of the home. It’s where kids do homework, friends gather for a glass of wine, and quick weekday meals are shared. However, getting the dimensions wrong can turn this dream feature into a daily obstacle. In this guide, I’ll share my hands-on experience to help you master the crucial measurements—from height and depth to clearance—ensuring your new island is both beautiful and perfectly ergonomic for your life in Portugal.
Quick summary
- Standard Heights Matter: A counter-height island is typically 92cm tall, aligning with your other worktops, while a bar-height island stands at around 107-110cm.
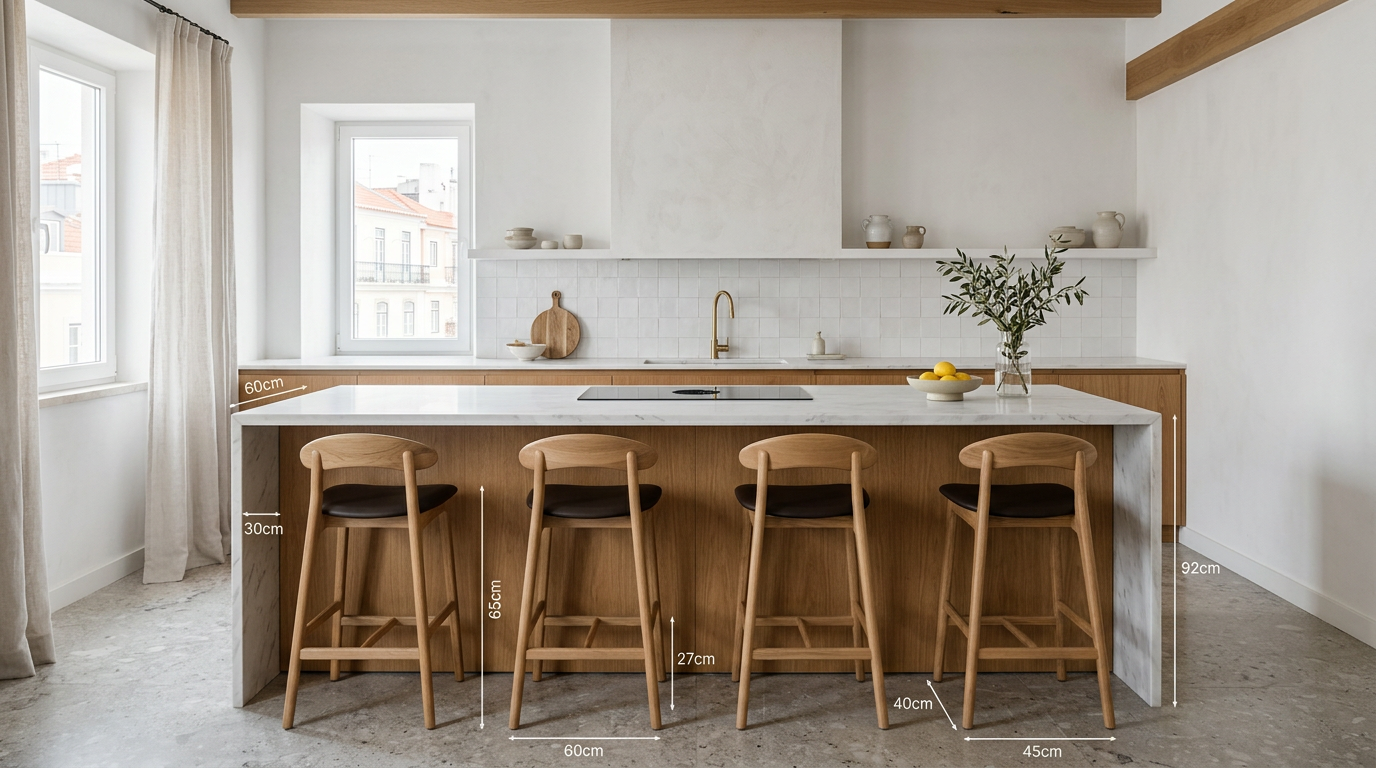
- Stool Selection is Key: Your stool seat should be 25-30cm lower than the underside of the island countertop for comfortable legroom.
- Essential Knee Space: A countertop overhang of at least 30-38cm is non-negotiable for comfortable seating. Skimping here is a common and regrettable mistake.
- Clearance is Everything: Plan for a minimum of 90cm of clear walkway space around the island, and 110cm or more for main traffic paths or areas with back-to-back seating.
- Seating Width: Allow about 60-70cm of width per stool to provide adequate elbow room and prevent a cramped feeling.
- Define the Function First: Decide if your island is primarily for dining, food prep, cooking, or a combination, as this will dictate its size, materials, and necessary features.
- Plan Professionally: A detailed layout plan from a professional, like our team at Mudelar, prevents costly errors in ergonomics and flow before construction begins.
Table of contents
- Understanding the Core Function of Your Kitchen Island
- Ergonomic Heights: Counter vs. Bar Height Seating
- Critical Dimensions: Getting the Overhang and Depth Right
- Planning for People: Seating Space and Walkway Clearance
- Material Choices for Your Island's Countertop and Base
- Lighting and Electricals for a Functional Island
Understanding the Core Function of Your Kitchen Island
Before we even think about measurements, the first question I always ask clients in Lisbon, from Cascais to Almada, is: what will you *do* at your island? The answer defines everything that follows. A kitchen island with stools is not a one-size-fits-all solution. Its design must be driven by its primary purpose, whether that’s as a bustling workstation, a relaxed social hub, or a versatile combination of both. Defining this role is the most critical step in your kitchen renovation journey.
For some, the island is the main food preparation zone. It needs a large, durable, uninterrupted surface. For others, it's a cooking centre, requiring the integration of a hob and extractor fan, which has major implications for ventilation and utilities. And for many families, it’s primarily a dining and social spot, where seating comfort, knee space, and ambience take precedence. Trying to make a small island do everything often results in it doing nothing well. Be realistic about your space and your lifestyle.
Workstation vs. Social Hub: Defining Your Island's Role
If your island is a workstation, you’ll want a single, expansive countertop at a comfortable working height (typically 92cm). Materials should be durable and easy to clean, like engineered quartz. Storage becomes a priority, with deep drawers for pots and pans or specialised inserts for utensils. Seating might be secondary, perhaps just a couple of stools tucked at one end. In contrast, a social hub island is designed around people. The seating area is generous, the lighting is warmer, and the countertop might feature a bar-height tier to create a distinct zone for guests, separating them from the kitchen workspace.
Integrating Appliances: Sinks, Hobs, and Storage
Incorporating appliances transforms an island from a simple table into a multifunctional powerhouse. Adding a small prep sink is incredibly practical, but it requires plumbing work. Installing a hob makes the island a central cooking station, which is great for social cooks who like to face their guests. However, this necessitates an extractor fan—either a ceiling-mounted unit or a modern downdraft model—and requires careful planning for gas or electrical lines. Every appliance you add eats into both counter space and the cabinet storage below, so it's a game of trade-offs that we can help you navigate during the design phase.
Ergonomic Heights: Counter vs. Bar Height Seating
Choosing the height of your island is one of the most significant decisions you'll make. It affects not only the look and feel of your kitchen but also its day-to-day comfort and functionality. The two main standards are counter height and bar height. Each has distinct ergonomic implications, and the right choice depends on your family's needs and how you envision using the space. I've seen both work beautifully in homes from Porto to the Algarve, but they serve slightly different purposes.
A counter-height island is typically 92cm tall, the same as the rest of your kitchen counters. This creates a seamless, cohesive look and provides a large, uniform work surface. It’s generally more comfortable for food prep while standing and is more accessible for children and elderly family members to sit at. A bar-height island, on the other hand, is taller, usually around 107cm to 110cm. This creates a separate, elevated zone that feels more like a traditional bar, which can be great for entertaining. The raised back also helps to visually shield any kitchen clutter from the view of an adjoining living or dining area.
Choosing the Right Stool Height
Once you’ve chosen your island's height, selecting the right stools is simple maths. The golden rule for ergonomic seating is to have 25-30cm of space between the top of the stool's seat and the underside of the countertop. For a 92cm counter-height island, you should look for stools with a seat height of 62-67cm. For a 107cm bar-height island, you'll need taller bar stools with a seat height of 77-82cm. Always measure the stool itself, not just rely on the labels 'counter' or 'bar' stool, as dimensions can vary between manufacturers.
Comfort and Accessibility Considerations
Think about who will be using the stools most often. Counter-height seating is generally more family-friendly. It's easier for kids to climb onto, and it's a more comfortable height for older adults. Bar-height stools can feel less stable for some people and may be more difficult to get in and out of. Stools with backrests and footrests significantly increase comfort for longer periods of sitting, transforming your island from a quick breakfast spot into a comfortable place for dinner or working from home. At Mudelar, we always discuss these lifestyle factors to ensure the final design works for everyone in your household.
Critical Dimensions: Getting the Overhang and Depth Right
This is where many DIY projects go wrong. You can have the most beautiful countertop and the perfect stools, but if you don’t have enough knee space, sitting at your island will be a miserable experience. The countertop overhang—the portion that extends beyond the island's base—is the single most important dimension for seating comfort. Without it, you’ll be forced to sit sideways or hunch over, which completely defeats the purpose of having a kitchen island with stools.
For a standard 92cm counter-height island, you need a minimum overhang of 35cm, with 38cm being ideal. This allows a seated adult to have enough room for their knees without banging against the cabinetry. For a taller 107cm bar-height island, you can get away with a slightly shallower overhang, around 25-30cm, because people tend to sit more perched on taller stools. Do not compromise on this. It's better to have one fewer cabinet than to have unusable seating.
Calculating Overhang for Different Materials
Your choice of countertop material can affect how large of an overhang you can have without extra support. Dense, heavy materials like engineered quartz or granite are very strong, but for overhangs exceeding 30-35cm, they often require structural support. This can come from discreet steel brackets or a decorative 'waterfall' end panel where the countertop material extends down the side of the island to the floor. Lighter materials like wood or high-pressure laminates might be more forgiving, but you should always follow the manufacturer's guidelines, a detail our technical team always verifies.
Total Island Depth for Functionality
To calculate the total depth of your island with seating, you add the standard cabinet depth to your desired overhang. Standard kitchen base cabinets are 60cm deep. So, a functional island with seating on one side should be at least 95cm deep (60cm cabinet + 35cm overhang). If you want storage on both sides (back-to-back shallow cabinets), or have appliances, the total depth will increase. Planning this footprint accurately is essential, especially in the beautiful but often compact apartments we work on in central Lisbon and Porto.
Planning for People: Seating Space and Walkway Clearance
An island doesn't exist in a vacuum. It sits within the ecosystem of your kitchen, and its success depends on how it interacts with the surrounding space. I always tell my clients to think about the 'negative space'—the empty areas around the island. This is the clearance, and it's absolutely crucial for flow, safety, and function. A perfectly sized island in a room that's too small for it is worse than no island at all. It creates bottlenecks and frustration, which is the opposite of what we want to achieve.
There are two types of clearance to plan for: walkway clearance and seating clearance. Walkway clearance is the space between the island and other counters, walls, or furniture. For a minor walkway where only one person will pass, you need a minimum of 90cm. For a main thoroughfare in the kitchen, like the path between the sink and the fridge, or in high-traffic homes in areas like Sintra or Oeiras, I strongly recommend 110-120cm. This allows two people to pass each other comfortably and lets you open appliance doors without blocking the path.
Minimum Walkway Clearances
To visualise this, use painter's tape on your floor to mark out the proposed island footprint. Then, measure the gaps.
- 90cm: The absolute minimum for a path. Only for low-traffic zones.
- 100cm: A comfortable width for one person to work or walk.
- 110-120cm: The ideal distance for busy walkways or for space behind seated stools, allowing others to pass.
- 120cm+: Necessary if you have appliances opening into the walkway (e.g., oven, dishwasher) or for wheelchair accessibility.
Calculating Seating Capacity
Just as important as walkway clearance is the space you allocate for each person sitting at the island. You need to account for elbow room. The standard rule is to allow 60-70cm of width per stool. To calculate how many stools you can fit, simply measure the length of your seating overhang and divide by 65cm. For example, a 2-metre-long island could comfortably accommodate three stools. Trying to squeeze in a fourth would make it feel cramped for everyone. Remember to also account for space at the corners; you don't want people knocking their knees on the island's end.
Material Choices for Your Island's Countertop and Base
The materials you choose for your kitchen island with stools define its look, feel, and long-term durability. As the focal point of the kitchen, the island is subjected to intense daily use, from hot pans and knife marks to spills and resting elbows. It’s vital to select materials that can withstand this activity while aligning with your aesthetic vision. In our projects across Portugal, we see a strong preference for materials that balance beauty with practicality.
The countertop is the star of the show. Engineered quartz, from trusted brands like Silestone and Compac, is by far the most popular choice. It's non-porous, highly resistant to scratches and stains, and comes in a vast array of colours and patterns that can mimic natural stone without the maintenance. Natural granite remains a classic for its unique beauty and heat resistance. For a warmer, more traditional look, a solid wood countertop (like oak or walnut) is beautiful, but it requires regular oiling to protect it from water and stains. High-pressure laminates from brands like Egger offer a budget-conscious option with surprisingly realistic finishes.
Durable Countertop Surfaces for High-Use Islands
When I advise clients, I stress that the island countertop is not the place to cut corners. Because it’s a standalone piece, it’s often used more heavily than perimeter counters. For a workstation island, the durability of quartz or granite is unmatched. For an island focused on dining and entertaining, you might also consider materials like solid surface composites that can be seamlessly integrated with a sink. The key is to match the material's properties to the island's primary function.
Cabinetry and Structural Support
The base of the island provides the structure and much-needed storage. The industry standard here in Portugal is moisture-resistant MDF, which is stable and provides a perfect surface for various finishes, including lacquer, thermolaminate, or wood veneer. The internal hardware—hinges and drawer runners—is just as important. High-quality, soft-close mechanisms ensure a premium feel and long-term reliability. For large islands or those with significant countertop overhangs, we often integrate a hidden steel frame within the cabinetry to provide robust, invisible support.
Lighting and Electricals for a Functional Island
Request a free, no-commitment quote. We reply within 24 hours.
Request a quote →Planning the lighting and electrical outlets for your kitchen island is not an afterthought; it should be an integral part of the initial design. I've seen too many beautiful islands rendered impractical by poor lighting or a lack of power points. A well-designed island needs a layered lighting scheme and thoughtfully placed outlets to be truly functional for modern life, whether you're in a new build in Setúbal or a renovated flat in Braga.
Lighting above an island serves two purposes: task lighting for food prep and ambient lighting for dining and socialising. A row of pendant lights is the most popular solution. For placement, they should hang approximately 75-90cm above the countertop. This is high enough not to obstruct views across the kitchen but low enough to provide focused light. The number and size of the pendants should be proportional to the island's length. For a long island, consider three smaller pendants or two larger ones. Always install them on a dimmer switch to allow for full control over the mood.
Choosing the Right Pendant Lighting
When selecting pendants, consider the style of your kitchen. Glass pendants create an open, airy feel, while metal or opaque shades provide more direct, downward-focused light. It's also important to think about the 'visual weight'. You don't want huge, bulky fixtures overwhelming a sleek, minimalist island. The goal is to complement the design, not compete with it. A lighting specialist, or an experienced design team like ours at Mudelar, can help you find that perfect balance.
Integrating Power and Charging Stations
In today's connected world, having accessible power at your kitchen island is essential. You'll need outlets for small appliances like blenders and mixers, as well as for charging laptops and phones. We often install outlets discreetly on the side panels of the island or use innovative pop-up socket towers that retract into the countertop when not in use. Including USB-A and USB-C ports directly in the outlets is a small upgrade that adds immense convenience. All electrical work must be done by a certified electrician to comply with Portuguese safety standards, a non-negotiable part of every Mudelar project.
Recommended materials and options
| Type | Features | When to choose |
|---|---|---|
| Engineered Quartz | Non-porous, highly resistant to scratches and stains. Consistent colour and pattern. Brands like Silestone offer warranties. | For a durable, low-maintenance, modern look. Ideal for busy families and as a primary food prep surface. |
| Natural Granite | Each slab is unique. Highly resistant to heat. Very durable, but requires sealing to prevent stains. | When you want a one-of-a-kind, natural stone look and excellent heat resistance for cooking zones. |
| Solid Wood | Provides a warm, natural aesthetic. Can be sanded and refinished if damaged. Naturally antibacterial. | For a rustic, traditional, or Scandinavian feel. Best for dining-focused islands or when a 'butcher block' prep area is desired. |
| High-Pressure Laminate | Budget-conscious with a huge range of colours and realistic wood/stone effects. Good stain resistance. | When you want to achieve a specific look without the investment of stone. Good for lower-use islands. |
| Stainless Steel | The professional choice. Extremely hygienic and heat-proof. Can be integrated seamlessly with sinks. | For a contemporary, industrial, or professional kitchen aesthetic. Perfect for islands dedicated to serious cooking. |
Quick comparison
| Feature | Counter Height Island (~92cm) | Bar Height Island (~107cm) |
|---|---|---|
| Stool Type | Counter stools (seat height ~65cm) | Bar stools (seat height ~80cm) |
| Ergonomics | More comfortable for working/prep. Easier for children and elderly to access. Feels more like a table. | Creates a 'perched' seating posture. Better for socialising and drinks. |
| Visual Integration | Creates a seamless, unified look with other kitchen countertops. Makes the kitchen feel larger. | Creates a distinct, separate zone. Can hide kitchen mess from adjoining living areas. |
| Best For | Families, food preparation, casual dining, and creating an expansive, single-level work surface. | Entertaining guests, creating a 'bar' atmosphere, and visually separating the kitchen from open-plan spaces. |
Common mistakes to avoid
- Ignoring Walkway Clearance. The most common error. An island that is too large creates traffic jams and makes the kitchen feel cramped. Always leave at least 90-110cm of clear space around it.
- Making the Countertop Overhang Too Shallow. An overhang of less than 30cm for seating is a recipe for discomfort. Your knees will constantly hit the cabinets, making the stools unusable for anything more than a few minutes.
- Choosing the Wrong Stool Height. Buying 'bar stools' for a 'counter height' island (or vice versa) is a frequent mistake. Always stick to the 25-30cm gap rule between the seat and the countertop for proper ergonomics.
- Forgetting Electrical and Lighting Needs. A dark, powerless island is only half-functional. Plan for pendant lighting on a dimmer and multiple power outlets, including USB ports, right from the start.
- Overcrowding with Too Many Stools. Don't try to squeeze in more seats than you have space for. Each person needs 60-70cm of width for elbow room to sit comfortably.
- Poor Material Choice for the Countertop. Choosing a soft or porous material like marble for a heavy-use prep island can lead to quick damage and stains. Match the material's durability to the island's function.
- A Design That's Out of Scale. A tiny island can look lost in a large kitchen, while a massive one will completely overwhelm a small space. The island's proportions must be in harmony with the room's overall dimensions.
Pre-project checklist
- Measure your total kitchen space accurately, noting doors, windows, and existing utilities.
- Define the island's #1 primary function: food prep, cooking, dining, or storage.
- Decide early on between a single-level counter height or a split-level bar height design.
- Use painter's tape on the floor to create a full-scale mock-up of your island. Live with it for a day or two to test walkways and flow.
- Determine the maximum number of people you want to seat at the island at one time.
- List all the features you want to integrate: a sink, hob, dishwasher, wine fridge, or pop-up outlets.
- Research countertop materials like quartz and granite, and request samples to see them in your home's light.
- Create a basic lighting plan. Where will pendants hang? Do you need task lighting?
- Think about storage. Do you need deep drawers for pots, or shallow cabinets for glassware?
- Contact a professional to review your plan and provide a detailed 3D rendering and quote.
How Mudelar handles it
At Mudelar, we believe a successful kitchen island with stools is born from meticulous planning, not guesswork. Our turnkey process removes the stress and uncertainty from your renovation. It begins with a detailed consultation where we listen to your needs and measure your space. Our design team then creates a photorealistic 3D model of your new kitchen, allowing you to visualise every detail—from the countertop overhang to the clearance around the stools—before any work begins.
We handle the entire project, from sourcing high-quality materials like Silestone countertops and Egger cabinetry to coordinating our certified electricians, plumbers, and master carpenters. Our dedicated project managers, like myself, oversee every stage of the installation, ensuring the final result perfectly matches the approved design, down to the last centimetre. This integrated approach, which you can learn more about in our services, guarantees a seamless experience and a beautifully ergonomic kitchen island built to last. Take a look at what we do to see our past projects.
Frequently asked questions (FAQ)
How much space do you need for a kitchen island with stools?
A kitchen with an island needs sufficient clearance. You should have a minimum of 90cm for walkways, but we strongly recommend 110-120cm for main traffic routes or for the space behind the stools. This ensures people can walk past comfortably even when someone is seated and allows for appliance doors to be opened without creating a blockage.
What is the standard height of a kitchen island with stools?
There are two standards. A 'counter height' island is about 92cm tall, matching the rest of your kitchen worktops. A 'bar height' island is taller, around 107-110cm. The choice depends on your preference for a seamless look versus a dedicated, elevated entertaining zone. Each requires a different height of stool for proper ergonomic comfort.
How deep should a kitchen island be for seating?
To accommodate comfortable seating, the island countertop must have an overhang. For a 92cm counter-height island, the overhang should be at least 35-38cm. For a 107cm bar-height island, a 25-30cm overhang is sufficient. Therefore, a basic island with a 60cm cabinet base and a seating area should have a total depth of at least 95cm.
Is a kitchen island a good idea for a small kitchen?
It can be, if designed smartly. A narrow, movable island or a peninsula attached to a wall can add valuable counter space and seating without blocking flow. In a small kitchen, it's crucial that the island doesn't violate the minimum walkway clearance of 90cm. A poorly planned island will make a small kitchen feel even more cramped.
What's the difference between a counter stool and a bar stool?
The difference is simply height. Counter stools are shorter, with a seat height of around 62-67cm, designed to fit under a standard 92cm kitchen counter. Bar stools are taller, with a seat height of 77-82cm, made for taller 107-110cm bar-height surfaces. It's essential to match the stool type to your island's height.
How many stools can I fit at my kitchen island?
To ensure everyone is comfortable and not bumping elbows, you should plan for 60-70cm of width per person. To find out how many stools you can fit, measure the linear length of your seating area and divide it by this number. For example, a 180cm (1.8m) long island can comfortably accommodate three stools.
Do I need planning permission for a kitchen island in Portugal?
Generally, no. Installing a kitchen island is considered interior furnishing and does not typically require a license from the câmara municipal (city council). However, if the installation involves moving structural walls, or significantly altering the building's plumbing or electrical systems, you may need to submit a project for approval. We always clarify this as part of our process.
How do I choose the right material for my island countertop?
Your choice should be based on durability, maintenance, and aesthetics. For a heavy-use island (food prep, cooking), engineered quartz (e.g., Silestone, Compac) is an excellent, low-maintenance choice. Natural granite offers great heat resistance. Wood provides warmth but requires more care. Your choice should reflect how you plan to use your island every day.
Conclusion
A well-executed kitchen island with stools can truly transform your home, creating a versatile hub for cooking, dining, and connecting. As we’ve explored, success lies in the details: the precise heights, the generous clearances, and the thoughtful ergonomic choices that prioritise comfort and flow. Getting these measurements right is the difference between an island that becomes the heart of your home and one that becomes a daily frustration. I hope this guide has given you the confidence to plan your project with a clear vision.
If you're ready to create the perfect, professionally designed kitchen island for your home in Lisbon, Porto, or anywhere in Portugal, our team at Mudelar is here to help. We take care of every detail, from the initial 3D design to the final installation. Request a free quote and let's start planning the kitchen you’ve always wanted.
Ready to start your renovation?
Request a free, no-commitment quote. We reply within 24 hours.
Request a quoteLer em português: Ilha de Cozinha com Bancos 2026: Medidas Essenciais | Mudelar