
02 September 2026
Shower Niches 2026: Sizing & Waterproofing Guide | Mudelar
Designing the perfect shower niches? Our expert guide covers sizing, placement, and essential waterproofing for a flawless finish. Get a free quote today.
As a technical lead at Mudelar, I’ve overseen countless bathroom renovations across Porto and the north of Portugal. One small feature that consistently delivers a huge impact is the shower niche. A well-designed recessed shelf elevates the entire space, eliminating clutter from plastic caddies and providing a sleek, integrated storage solution. However, getting it right is a matter of precision. This guide will walk you through everything you need to know about planning your shower niches, from critical sizing and placement decisions to the non-negotiable techniques for waterproofing. By the end, you’ll understand how to ensure your niche is not only beautiful but also built to last.
Quick summary
- Perfect Placement is Key: The ideal height for a shower niche is between 120cm and 150cm from the shower floor, easily accessible for most adults.
- Size Matters: A standard niche is often 30cm wide by 60cm high, but custom sizes should be based on the products you use daily.
- Waterproofing is Non-Negotiable: Using a high-quality waterproofing membrane, like a liquid-applied system or a pre-formed kit, is crucial to prevent mould and structural damage.
- A Slope is Essential: The bottom shelf of the niche must have a slight downward slope (2-3 degrees) to ensure water drains out completely.
- Material Choice Impacts Maintenance: Using a solid piece of quartz or stone for the shelf eliminates grout lines, simplifying cleaning.
- Avoid Exterior Walls: Whenever possible, avoid placing a niche on an exterior wall to prevent issues with insulation and heat loss.
- Custom vs. Prefabricated: You can choose between a custom-built niche for total flexibility or a prefabricated one for faster, guaranteed waterproof installation.
Table of contents
- What Exactly is a Shower Niche?
- Critical Sizing and Placement Considerations
- The Non-Negotiable Step: Waterproofing Your Shower Niche
- Building a Custom Shower Niche: A Step-by-Step Overview
- Materials and Finishes: From Tile to Solid Surfaces
- Prefabricated vs. Custom-Built Niches: Which is Right for You?
- Recommended materials and options
- Quick comparison
- Common mistakes to avoid
- Pre-project checklist
- How Mudelar handles it
- Frequently asked questions (FAQ)
- Conclusion
What Exactly is a Shower Niche?
A shower niche is a recessed shelf built directly into the wall of your shower or bath area. Its primary purpose is to provide stylish, permanent storage for shampoos, soaps, and other bathing essentials. Unlike aftermarket shower caddies that hang from the showerhead or stick to the wall with suction cups, a niche is an integrated part of the bathroom's architecture. This creates a clean, uncluttered look and adds a touch of custom-built luxury to your home, a feature we see requested more and more in our renovation projects in Porto and Lisbon.
Functionally, it solves the universal problem of where to put things in the shower. Aesthetically, it offers a fantastic design opportunity. You can tile it with the same material as the surrounding walls for a seamless, minimalist effect, or use a contrasting tile or stone to create a beautiful accent feature. There are two main types: custom-built niches, which are framed and waterproofed on-site, and prefabricated niches, which are pre-formed, waterproof units ready for tiling. Both are excellent options when installed correctly.
Critical Sizing and Placement Considerations
Planning the size and location of your shower niches is one of the most important steps. These decisions affect not only the final look but also the day-to-day usability of your shower. Poor placement can be an annoyance, while incorrect sizing can render the niche useless. As a rule, we always begin this conversation with a client by asking them to bring their actual shampoo and soap bottles to the site visit.
Standard Shower Niche Dimensions
While there's no single 'correct' size, some common dimensions serve as a great starting point. A very popular vertical niche size is 30cm wide by 60cm high. This allows for a central shelf, creating two compartments, each tall enough for standard and even some taller pump-action bottles. For height, you need at least 30-35cm of clearance to accommodate most products. The depth is typically determined by the wall cavity, usually around 9cm in a standard stud wall. This is more than sufficient for any bottle.
Custom Sizing for Your Needs
This is where you can truly tailor the shower to your lifestyle. A large, horizontal niche running the length of a feature wall can make a dramatic statement and provide ample storage. Alternatively, you might opt for two or three smaller, stacked square niches for a more geometric, organised look. My advice is always practical: measure your largest bottle. Add a few centimetres for clearance, and that's your minimum required height. Do you buy in bulk? Plan for it. This practical approach ensures you won't be frustrated later.
Optimal Placement within the Shower
The ideal height for a shower niche is between 120cm and 150cm from the shower floor. This puts it at roughly chest height for the average adult, making it easy to reach without bending down or stretching up. It should be placed on a wall that doesn't contain the main plumbing for the shower valve or head, as this complicates construction. We also try to position it away from the direct, high-pressure spray of the showerhead. While it will get wet, avoiding a constant deluge helps with drainage and longevity.
The Non-Negotiable Step: Waterproofing Your Shower Niche
If you take only one thing away from this article, let it be this: a shower niche must be 100% waterproof. I cannot overstate this. A leaking niche is not a cosmetic issue; it's a catastrophic failure that can lead to mould, rotting structural timbers, tile detachment, and thousands in damage that can spread to adjacent rooms. At Mudelar, we consider waterproofing to be the most critical stage of any bathroom renovation, especially in humid climates like those found in coastal areas near Aveiro and Setúbal.
Why Waterproofing is Absolutely Crucial
Tile and grout are not waterproof. They are water-resistant, but water vapour and moisture can and will penetrate them over time. Without a continuous waterproof barrier behind the tile, this moisture seeps into the wall cavity. In the dark, damp space behind your wall, this creates the perfect breeding ground for black mould. It also slowly degrades the drywall or plasterboard, and can even cause the wooden studs of the wall to rot, compromising the structural integrity of your home.
Waterproofing Methods: Membranes and Panels
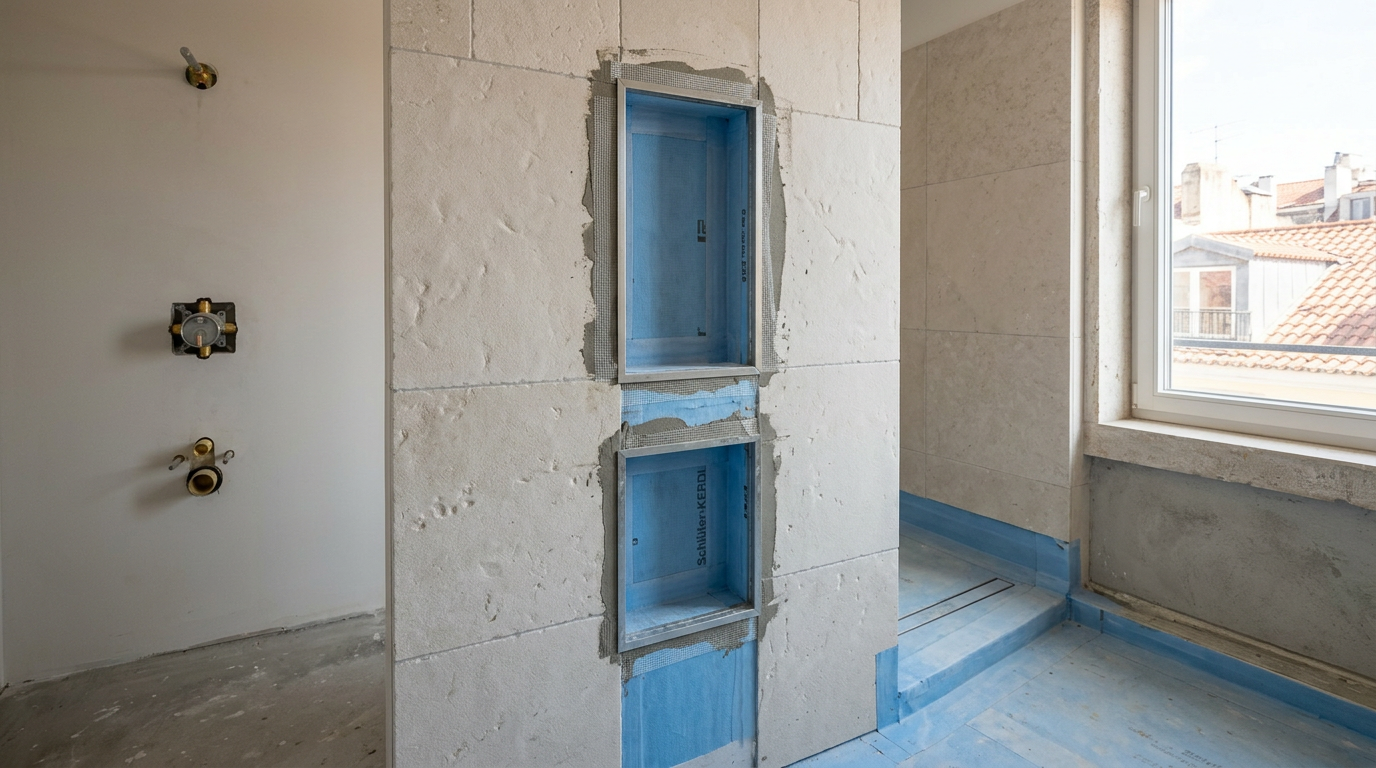
There are two primary professional methods for waterproofing a custom niche. The first is using a pre-formed, waterproof niche made from extruded polystyrene foam coated with a waterproof membrane, such as the well-known Schluter-KERDI-BOARD-SN models. These are installed directly into the wall framing and are inherently waterproof. The second method, used for fully custom sizes, involves lining the framed-out niche with a cement backer board and then applying a waterproofing membrane. This can be a liquid-applied membrane painted on in several coats or a sheet membrane like Schluter-KERDI, carefully cut and folded at the corners with all seams sealed with a compatible sealant.
Ensuring a Proper Slope
A tiny detail with massive consequences is the slope of the horizontal surfaces, particularly the bottom shelf. Every shelf in a shower niche must have a very slight, almost imperceptible slope toward the shower. A slope of 2-3 degrees is enough. This ensures that any water that splashes into the niche drains out freely instead of pooling. Standing water leads to soap scum build-up, promotes mould growth in grout lines, and places constant stress on the waterproofing system. We build this slope into the framing or the mortar bed before the tile is ever laid.
Building a Custom Shower Niche: A Step-by-Step Overview
Creating a durable and beautiful custom shower niche is a job of precision. Here’s a simplified look at how our teams at Mudelar approach the process, ensuring a flawless result every time.
- Framing: First, we identify a suitable location between the existing wall studs, which are typically spaced 40cm or 60cm apart. We then cut the opening in the backer board and build a box frame using treated timber. This includes a header, a sill, and vertical supports. The bottom sill is cut at a slight angle to create the necessary drainage slope from the very start.
- Installing the Backer Board: We line the inside of the new frame with a waterproof-friendly backer, typically a cement board or a specialised foam construction panel like Schluter-KERDI-BOARD. Every piece is cut to fit snugly and secured with corrosion-resistant screws.
- Waterproofing Application: This is the critical stage. We apply a continuous waterproofing layer over the entire interior of the niche. If using a sheet membrane, we pay special attention to the corners, using pre-formed corner pieces and overlapping all seams by at least 5cm, sealing them with a waterproofing band and sealant. If using a liquid membrane, we apply multiple coats to achieve the required thickness, embedding reinforcement fabric at all seams and corners.
- Tiling and Grouting: Once the waterproofing has fully cured, we begin tiling. We often use thin-set mortar fortified with a polymer additive for superior adhesion in a wet environment. We start from the back wall and work our way out, ensuring crisp lines and perfect alignment. After the tiles are set, we grout the joints, often recommending an epoxy grout for its superior stain and water resistance, especially on the main shelf.
Materials and Finishes: From Tile to Solid Surfaces
The materials you choose for your shower niches have a significant impact on both the bathroom's aesthetic and the niche's long-term maintenance. This is an opportunity to add a designer touch, whether through subtlety or a bold statement. From our projects in high-end renovations in Cascais to modern apartments in Braga, the material choice is always a key discussion point.
Tiling Your Niche
The most common approach is to tile the niche with the same tiles used on the shower walls. This creates a seamless, integrated look that is subtle and sophisticated. Using large-format, rectified porcelain tiles can minimise grout lines, contributing to this clean aesthetic. Alternatively, using a different tile—such as a mosaic, a patterned tile, or one with a contrasting colour or texture—can turn the niche into a stunning focal point. This is a great way to add a pop of personality to the bathroom without overwhelming the space.
Solid Surface Shelves
One of my favourite recommendations is to use a single, solid piece of material for the base shelf of the niche. A custom-cut piece of engineered quartz (from brands like Silestone or Compac), marble, or granite is an excellent choice. The primary advantage is the complete elimination of grout lines on the surface where water and soap residue are most likely to collect. This makes cleaning incredibly easy and prevents any chance of mould growing in the grout on that main horizontal plane. The solid shelf provides a clean, high-end finish that is both practical and beautiful.
Prefabricated vs. Custom-Built Niches: Which is Right for You?
When planning for shower niches, you'll face a key decision: use a prefabricated unit or build a custom one from scratch? Both paths lead to a great result when done correctly, but they have different strengths. The choice often depends on the project's specific needs for flexibility, speed, and design.
A prefabricated niche is a pre-formed, fully waterproof box, typically made of coated polystyrene or ABS plastic. Its biggest advantage is speed and reliability. The waterproofing is guaranteed from the factory, which can save a day of labour on site and remove any chance of installer error in the complex waterproofing stage. However, they come in standard sizes, so you have less design freedom. They are an excellent, pragmatic choice for many projects.
A custom-built niche, on the other hand, offers complete creative freedom. You can define the exact size, shape, and configuration, whether it's a shallow niche for a razor, a tall one for oversized bottles, or a panoramic horizontal niche that spans the entire wall. This level of customisation allows the niche to be perfectly integrated into your specific design vision. It requires more skilled labour, particularly for the multi-step waterproofing process, but the result is a truly bespoke feature.
Recommended materials and options
Request a free, no-commitment quote. We reply within 24 hours.
Request a quote →| Type | Features | When to choose |
|---|---|---|
| Prefabricated Waterproof Niche (e.g., Schluter-KERDI-BOARD-SN) | 100% waterproof out of the box, fast installation, standard sizes. | When speed and guaranteed waterproofing are top priorities, and a standard size works for your design. |
| Liquid Waterproofing Membrane | Flexible application for any custom size/shape, creates a seamless monolithic barrier. | For custom-built niches with unique dimensions or multiple shelves where sheet membranes would be complex. |
| Rectified Porcelain Tile | Extremely durable, water-resistant, with minimal grout lines for a clean look. | For tiling the niche interior to match or contrast with shower walls, creating a modern, seamless appearance. |
| Engineered Quartz Shelf (e.g., Silestone, Compac) | Non-porous, stain-resistant, no grout lines on the shelf for easy cleaning. | For the base of the niche to provide a durable, low-maintenance surface that looks high-end. |
| Epoxy Grout | Highly resistant to water, stains, and mould. Does not require sealing. | For grouting the niche tiles, especially the shelf, to ensure maximum durability in a high-moisture area. |
Quick comparison
| Feature | Prefabricated Niche | Custom-Built Niche |
|---|---|---|
| Installation Speed | Faster. The unit is pre-formed and waterproof. | Slower. Requires framing, boarding, and multi-step waterproofing on-site. |
| Size & Shape Flexibility | Limited to standard manufacturer dimensions. | Unlimited. Can be any size or shape you can design. |
| Waterproofing | Guaranteed from the factory. Very reliable. | Dependent on installer skill. Must be done meticulously. |
| Final Appearance | Excellent, but constrained by standard shapes. | Bespoke. Perfectly tailored to your design vision. |
| Integration | Good. Tiled over to blend in. | Perfect. Framed and built as an integral part of the wall structure. |
Common mistakes to avoid
- Forgetting the Slope. Building the shelves completely flat is the most common mistake. Without a slight slope, water will pool, creating a permanent puddle that leads to soap scum and mould.
- Improper or Incomplete Waterproofing. Simply using 'water-resistant' plasterboard is not enough. You must use a dedicated system like a membrane or a pre-formed niche. Skipping corners or seams is a recipe for failure.
- Incorrect Placement. Placing the niche too low (hard to reach), too high (unstable bottles), or directly in the path of the main water jet from the showerhead will make it less functional.
- Building on an Exterior Wall. Without very careful planning for insulation, placing a niche on an exterior wall can create a cold spot, leading to condensation issues and reducing your home's energy efficiency, a key factor under regulations like DL 118/2013.
- Making It Too Small. It sounds obvious, but many people design a niche without first measuring their products. Always measure your tallest and widest bottles to ensure they will actually fit.
- Using the Wrong Framing. The niche needs its own internal frame (a box). Simply cutting a hole in the plasterboard between two studs without proper support will lead to cracks and failure.
- Poor Tile Layout. Not planning the tile layout can result in awkward, thin slivers of tile inside the niche, which looks unprofessional and creates weak points in the grout.
Pre-project checklist
- Gather the shampoo, conditioner, and body wash bottles you use most often.
- Measure the height and width of your largest bottles to determine the minimum internal dimensions.
- Decide on the ideal location inside the shower (chest height, away from direct spray).
- Confirm there is no plumbing or electrical wiring inside the wall where you want the niche.
- Choose your materials: will the niche be tiled, and will you use a solid shelf?
- Decide between a single large niche, or multiple smaller ones.
- Consider incorporating LED lighting for a high-end, atmospheric touch.
- Discuss with your contractor whether a prefabricated or custom-built niche is better for your project.
- Plan the tile layout in advance to ensure a clean, professional finish.
How Mudelar handles it
At Mudelar, we treat the construction of shower niches with the same precision and care as any other critical part of a bathroom renovation. Our turnkey process means we handle everything from the initial design consultation to the final sealant application. We start by understanding your needs—what you want to store, and the look you want to achieve. Our expert teams in Porto, Lisbon, and across Portugal then execute the plan flawlessly, ensuring the structure is sound, the waterproofing is bulletproof, and the tiling is perfect. We favour robust solutions like Schluter systems and high-performance epoxy grouts to guarantee a result that is as durable as it is beautiful.
Our commitment is to deliver a finished space that exceeds your expectations, with every detail considered. We integrate features like shower niches seamlessly into the overall design, ensuring they enhance your daily routine. If you’re considering a bathroom renovation, we invite you to request a free quote and learn more about our services. You can trust the experience and dedication of the Mudelar team. Find out more about us and our commitment to quality.
Frequently asked questions (FAQ)
How deep should a shower niche be?
The typical depth of a shower niche is about 9cm (3.5 inches). This is because it's usually built within a standard timber stud wall, and that's the depth of the studs. This is more than enough space to comfortably hold even the widest shampoo bottles and other accessories without them protruding from the wall.
Do I need a permit for a shower niche?
No, you do not need a municipal permit (licença) in Portugal simply to add a shower niche as part of a bathroom renovation. This type of interior alteration is considered maintenance or refurbishment work and does not require planning permission, provided you are not altering the building's structure, façade, or footprint.
Is a shower niche better than a corner shelf?
Yes, in most cases. A shower niche offers a more streamlined, integrated look and is easier to clean as it has no exposed brackets or tricky corners. Corner shelves can feel cluttered and are often prone to rust or damage. A recessed niche keeps everything neatly tucked away, contributing to a more spacious and luxurious feel in the shower.
How do you waterproof a shower niche correctly?
Correct waterproofing involves creating a continuous, sealed barrier behind the tiles. This is achieved either by installing a prefabricated waterproof niche unit or by lining a custom-built frame with a cement backer board and then applying a sheet or liquid waterproofing membrane. All corners, seams, and screw heads must be meticulously sealed according to the manufacturer's instructions.
What is the best height for a shower niche?
The best height is generally between 120cm and 150cm (48 to 60 inches) from the shower floor. This places it at chest level for most adults, making it easy to access items without bending over or reaching up high. However, it can be customised based on your personal height and preference.
Can you put a shower niche on an outside wall?
It is strongly advised to avoid placing a shower niche on an exterior wall. Doing so creates a break in your home's insulation, leading to a significant cold spot. This can cause condensation to form inside the wall cavity, potentially leading to mould and heat loss. If it's the only option, it requires very careful insulation behind and around the niche.
What's the difference between a prefabricated and a custom niche?
A prefabricated niche is a pre-made, factory-waterproofed unit in standard sizes. It’s faster to install. A custom niche is built on-site to any size or shape you desire, offering complete design freedom but requiring more labour and expert on-site waterproofing. The choice depends on your design goals and project timeline. Our blog has more comparisons on materials.
How do you clean a shower niche?
Cleaning is straightforward. For tiled niches, use a non-abrasive bathroom cleaner and a soft brush for the grout lines. The best way to minimise cleaning is to use a squeegee on the niche after every shower. If your niche has a solid quartz or stone shelf, cleaning is even easier—simply wipe it down. Using epoxy grout also helps as it resists staining and mould growth.
Conclusion
A thoughtfully designed and expertly constructed shower niche is more than just a shelf; it's a mark of quality in a modern bathroom. It’s a feature that blends form and function, providing essential storage while elevating the aesthetic of your entire space. As we've covered, success lies in the details: proper sizing for your needs, strategic placement, and above all, uncompromising waterproofing. Getting these elements right ensures your investment is beautiful, practical, and durable for years to come. If you're ready to upgrade your bathroom with features like this, professionally installed, I invite you to request a free quote from our team at Mudelar.
Ready to start your renovation?
Request a free, no-commitment quote. We reply within 24 hours.
Request a quoteLer em português: Nichos de Duche 2026: Dimensões e Impermeabilização | Mudelar